
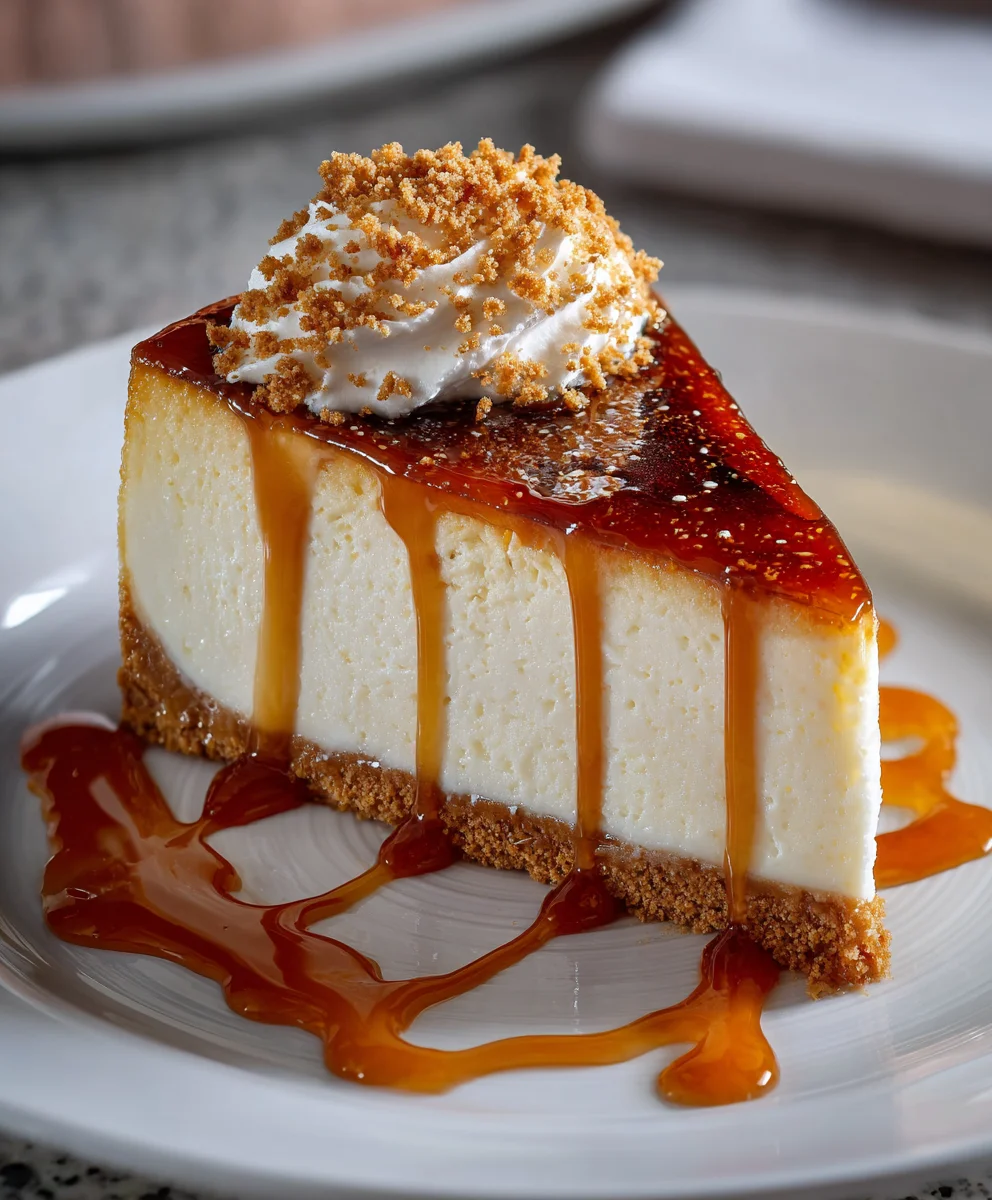
Introduction to Bruleed Vanilla-Bean Cheesecake
There’s something magical about desserts that whisk you away to a world of sweetness. My Bruleed Vanilla-Bean Cheesecake is one such delight that promises to transport you with every decadent bite. As a busy mom, I know how important it is to indulge once in a while. This cheesecake not only satisfies your sweet cravings but also impresses your loved ones. Whether it’s a special occasion or a spontaneous treat, this recipe brings comfort and joy to your kitchen. Let’s dive into this creamy dream, because who doesn’t deserve a slice of bliss?
Why You’ll Love This Bruleed Vanilla-Bean Cheesecake
This Bruleed Vanilla-Bean Cheesecake is not just a dessert; it’s a luscious experience that’s surprisingly simple to craft. With a buttery graham cracker crust and rich, vanilla-infused filling, you’ll find joy in every forkful. It looks and tastes like something from a fancy restaurant, yet it fits perfectly into your busy life. Plus, the brulée topping is a showstopper, making it perfect for impressing guests or treating yourself!
Ingredients for Bruleed Vanilla-Bean Cheesecake
Creating the perfect Bruleed Vanilla-Bean Cheesecake begins with gathering the right ingredients. Each element plays a vital role in achieving that luxurious flavor and texture. Here’s what you’ll need:
- Graham Crackers: These serve as a deliciously buttery base. You can replace them with digestive biscuits if preferred.
- Granulated Sugar: This sweetens the crust and filling. For a twist, try brown sugar for a deeper flavor.
- Kosher Salt: Just a pinch enhances sweetness and balances the cheesecake’s richness.
- Unsalted Butter: Helps bind the crust together. You could substitute with coconut oil for a dairy-free option.
- Cream Cheese: The star of the show, providing creaminess. Use full-fat for that rich texture. It’s best to bring it to room temperature for easier blending.
- Sour Cream: Adds a tangy flavor, making the cheesecake light and fluffy. Greek yogurt can work as a healthier substitute.
- Egg: Vital for binding and providing a dense structure. Make sure it’s at room temperature for the best results.
- Vanilla Bean or Vanilla Extract: Fresh vanilla beans impart an aromatic essence. Pure vanilla extract is a convenient alternative.
- Superfine Sugar: Crucial for the brûlée topping, allowing it to melt and caramelize evenly.
- Spun Sugar: While optional, it adds a whimsical touch to your cheesecake. You can make it ahead and store it simply before serving.
The specific quantities for these ingredients are listed at the bottom of this article and are available for printing. Happy baking!
How to Make Bruleed Vanilla-Bean Cheesecake
Step 1: Preheat and Prepare the Crust
Let’s kick off this delightful adventure by preheating your oven to 350°F (175°C). While the oven warms up, grab your food processor and toss in the graham crackers, granulated sugar, and a pinch of kosher salt. Pulse until they resemble fine crumbs, almost like sandy beaches. Add the melted unsalted butter and pulse again until everything clumps together. Now, here’s the fun part! Press the crumb mixture firmly into the bottom and up the sides of a 9-inch tart pan with a removable bottom. This bit takes a little muscle, but it’s so worth it. Place your crust on a baking sheet and pop it in the oven. Bake for about 10 to 12 minutes until it’s set and dry. Once it’s done, allow it to cool completely on a wire rack. Breathe in that buttery goodness!
Step 2: Make the Cheesecake Filling
Now that your crust is cooling, let’s whip up that creamy cheesecake filling. In a clean food processor, combine the cream cheese, sour cream, granulated sugar, and one large egg. Make sure everything is at room temperature—it makes a world of difference in texture. Add the seeds scraped from a vanilla bean or a teaspoon of pure vanilla extract for that heavenly aroma. Blend just until smooth—overmixing can lead to a tough texture, and nobody wants that! Once it’s beautifully creamy, carefully pour the filling into your cooled crust. Use a spatula to smooth the top evenly. This is where patience pays off, as a smooth top means neat slices later. Now it’s time to bake your cheesecake! Place your tart pan back in the oven and bake for 30 to 35 minutes, or until the center is just set—think jiggly but not liquid. Then transfer to a wire rack to cool for an hour. Serious reward for your efforts!
Step 3: Bake and Chill the Cheesecake
After letting your cheesecake cool at room temperature, it’s time for the chilling part. Pop it into the fridge and let it chill thoroughly for at least two hours or overnight if you can wait that long. This waiting game is tough, but it enhances the flavors and texture. You want the cheesecake to firm up beautifully, making slicing a breeze later. Before serving, ensure the cheesecake is completely cool, and take a moment to admire its creamy, dreamy beauty. If you peek at it too soon, you’ll risk a gooey slice, and we don’t want that drama on serving day. Patience is key; your hard work will pay off in the end!
Step 4: Brulée the Top
Now for the grand finale: the caramelized brulée topping! Take your chilled cheesecake and sift a tablespoon of superfine sugar evenly over the surface. Make sure to avoid the crust, as it can burn. Grab your small kitchen blowtorch and caramelize the sugar by sweeping the flame back and forth across the surface. Concentrate toward the center for that perfect golden brown. For a show-stopping finish, repeat with the remaining sugar to create a second layer. This glorious brulée layer adds a sweet crunch that complements the creamy cheesecake. Enjoy the caramel aroma—it’s pure magic!
Tips for Success
- Always use room temperature ingredients for a smoother cheesecake.
- Don’t overmix the filling; blend just until smooth to keep it light.
- For neat slicing, use a sharp knife, and wipe it clean between cuts.
- Make the spun sugar ahead of time to save time on serving day.
- Let the cheesecake chill overnight for the best flavor and texture.
Equipment Needed
- Food Processor: Essential for blending the crust and filling smoothly; a blender works too.
- Tart Pan with Removable Bottom: This makes it easier to serve; a regular pie dish can also be used.
- Kitchen Blowtorch: Ideal for caramelizing the topping; a broiler can be a handy substitute.
- Mixing Bowls: Useful for any extra mixing as needed; simply use what you have on hand.
Variations
- Berry Swirl: Add a fruit puree, such as raspberry or strawberry, to the cheesecake filling before baking for a fruity twist.
- Chocolate Lovers: Fold in chopped dark chocolate or cocoa powder into the filling for a rich chocolate cheesecake.
- Gluten-Free Option: Substitute the graham crackers with gluten-free cookies or almond flour to create a gluten-free crust.
- Reduced Sugar: Use a sugar substitute to lower the sugar content without sacrificing taste.
- Dairy-Free Version: Swap cream cheese with a dairy-free cream cheese alternative and use coconut cream instead of sour cream for a vegan take.
Serving Suggestions
- Fresh Berries: Serve with a handful of raspberries or strawberries for a pop of color and freshness.
- Coffee or Tea: Pair with a rich cup of coffee or a soothing herbal tea for a delightful balance.
- Elegant Plating: Drizzle a fruit coulis around the cheesecake for a stunning presentation.
- Whipped Cream: Add a dollop of freshly whipped cream on the side for extra decadence.
FAQs about Bruleed Vanilla-Bean Cheesecake
Can I make the Bruleed Vanilla-Bean Cheesecake ahead of time?
Absolutely! In fact, making it a day in advance is a great idea. Chilling overnight allows the flavors to meld beautifully, enhancing the overall taste. Just remember to add the brulée topping before serving for that fresh appeal.
What’s the best way to store leftover cheesecake?
Store any leftover slices in an airtight container in the fridge. It should last up to five days. Just be wary—those delectable leftovers may disappear quickly!
Can I use a different type of crust?
Yes! While the graham cracker crust is traditional, you can experiment with Oreo cookies or even a nut-based crust for a gluten-free twist. Just ensure it’s pressed firmly and baked until set.
How do I know when the cheesecake is baked perfectly?
The key is checking for a slight jiggle in the center. It should be mostly set but have a slight give to it. Remember, it will continue to cook a bit while it cools.
What if I don’t have a kitchen blowtorch?
No worries! You can achieve a similar effect using your oven’s broiler. Just watch it closely, as it can burn quickly. Move the cheesecake to a higher rack, sprinkle the superfine sugar, and let it caramelize for a minute or so.
Final Thoughts on Bruleed Vanilla-Bean Cheesecake
Every slice of Bruleed Vanilla-Bean Cheesecake is a little moment of happiness. It’s a reminder that even the busiest days deserve a touch of indulgence. This recipe holds the power to turn an ordinary dinner into a special occasion, bringing family and friends together around a table filled with laughter and joy. As you savor the creamy texture and delightful crunch of the caramelized top, I hope you feel a sense of pride in creating something so beautiful. So go ahead, indulge! You and your loved ones are worth it—sweets included!
Print
Bruleed Vanilla-Bean Cheesecake
- Total Time: 3 hours 15 minutes (includes chilling time)
- Yield: 8 servings 1x
- Diet: Vegetarian
Description
A rich and creamy vanilla-bean cheesecake with a caramelized brûlée topping, perfect for indulging in pure bliss.
Ingredients
- 12 graham crackers, broken into pieces
- 3 tablespoons granulated sugar
- Pinch of kosher salt
- 5 tablespoons unsalted butter, melted
- 450 grams cream cheese, at room temperature
- 120 millilitres sour cream
- 100 grams granulated sugar
- 1 large egg, at room temperature
- 1 vanilla bean, seeds scraped, or 1 teaspoon pure vanilla extract
- Pinch of kosher salt
- 50 grams superfine sugar, divided
- Spun sugar, for topping
Instructions
- Preheat oven to 175°C.
- In a food processor, pulse graham crackers with granulated sugar and kosher salt until finely ground.
- Add melted butter and pulse again until evenly combined.
- Press mixture firmly into the base and up the sides of a 23-centimetre round tart pan with removable bottom.
- Place pan on a baking sheet and bake until dry and set, 10 to 12 minutes.
- Transfer to a wire rack and let cool completely.
- In a clean food processor, blend cream cheese, sour cream, granulated sugar, egg, vanilla seeds or extract, and a pinch of kosher salt just until smooth.
- Pour cheesecake batter into the cooled crust, smoothing top evenly.
- Bake cheesecake at 175°C until filling is just set, 30 to 35 minutes.
- Transfer pan to a wire rack and cool for 1 hour.
- Then refrigerate until thoroughly chilled, at least 2 hours or up to overnight.
- Before serving, sift 1 tablespoon superfine sugar evenly over the surface of the chilled cheesecake, avoiding the crust.
- Caramelize sugar with a small kitchen blowtorch by sweeping flame back and forth over the surface, concentrating towards the centre to avoid burning the crust.
- Repeat with the remaining tablespoon superfine sugar to create a second evenly brûléed layer.
- Top the cheesecake with spun sugar.
- To serve, slice with a sharp knife, wiping the blade clean between cuts for neat slices.
Notes
- Ensure the cream cheese is at room temperature for a smoother filling.
- Do not overmix the filling to avoid cracks.
- Use a sharp knife for clean slices.
- Prep Time: 30 minutes
- Cook Time: 45 minutes
- Category: Dessert
- Method: Baking
- Cuisine: American
Nutrition
- Serving Size: 1 slice
- Calories: 450
- Sugar: 30g
- Sodium: 300mg
- Fat: 30g
- Saturated Fat: 15g
- Unsaturated Fat: 10g
- Trans Fat: 0g
- Carbohydrates: 40g
- Fiber: 1g
- Protein: 7g
- Cholesterol: 90mg