
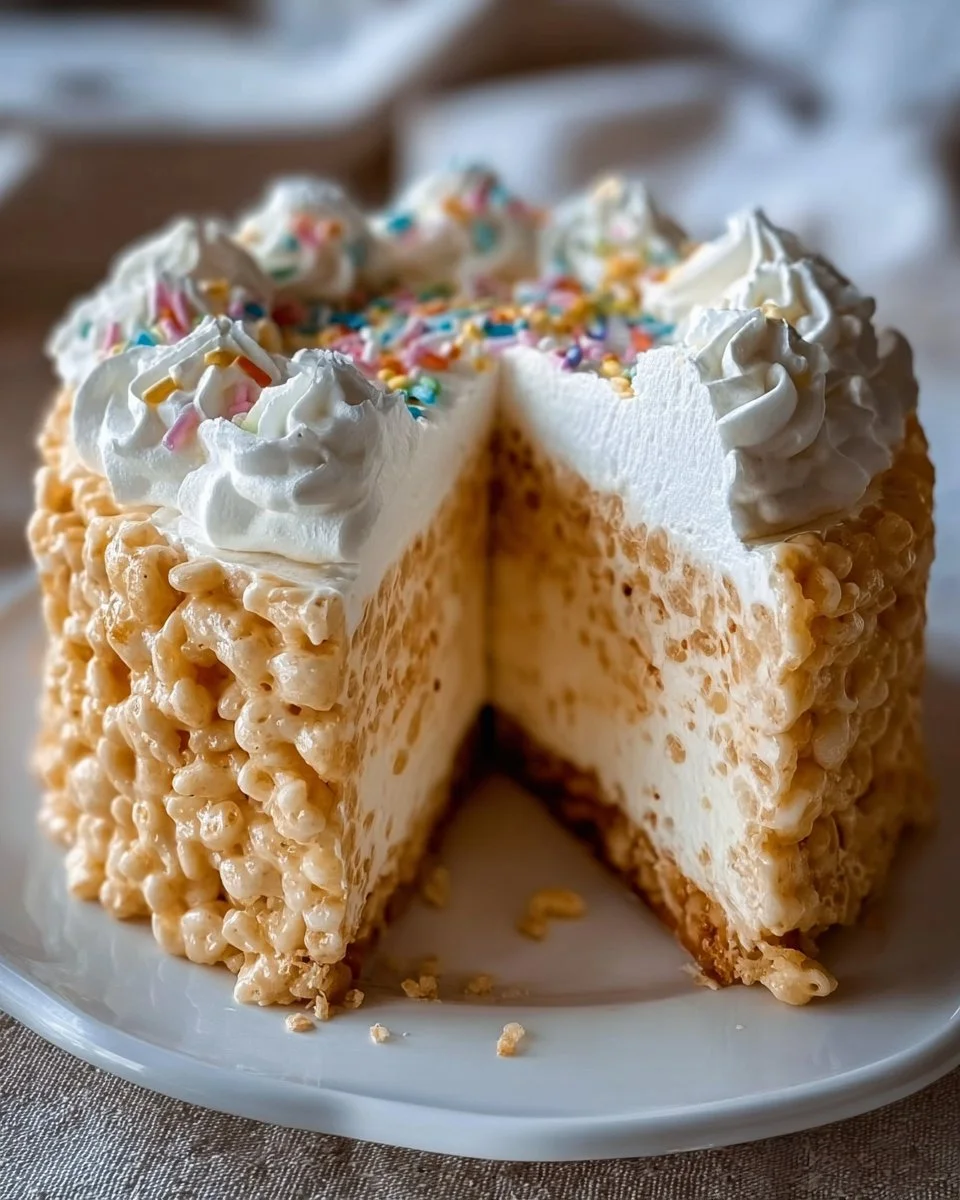
Rice Krispie Treat Cheesecake – a name that just rolls off the tongue, doesn’t it? I remember the first time I made this delicious dessert. It was a sunny Saturday afternoon, and I had a few friends over. Honestly, we all love cheesecake, but when I combined the nostalgic crunch of Rice Krispies with the creamy goodness of cheesecake, it stirred something magical. The mix of textures and flavors blew everyone away!
As the layers of marshmallow and cream cheese came together, I could feel the excitement in the air. This Rice Krispie Treat Cheesecake isn’t just a dessert; it’s an experience, a trip down memory lane wrapped up in a smooth, creamy slice. So, gather your ingredients and let’s dive in!
Why You’ll Love This Rice Krispie Treat Cheesecake
There’s a special charm to Rice Krispie Treat Cheesecake. Here are just a few reasons why it should be on your baking radar:
- Sweet Nostalgia: The Rice Krispie base takes you back to childhood days, while the creamy cheesecake layer elevates it to adult dessert territory.
- Easy to Make: I’m all about simplicity in the kitchen. Trust me, this recipe isn’t complicated. It comes together quickly, making it perfect for last-minute gatherings.
- Versatile for Any Occasion: Birthdays, potlucks, or just because you feel like treating yourself; this cheesecake fits right in.
Okay, now that you’re on-board with this sweet adventure, let’s get into the nitty-gritty!
Preparation Phase & Tools to Use
Before you rush off to gather supplies, let me tell you about a few tools that’ll make your life easier:
- 9-inch Springform Pan: This is perfect for holding that creamy filling.
- Large Mixing Bowls: You’ll need a few of these since we’re layering.
- Saucepan: For melting the butter and marshmallows—small but important!
- Mixer: A handheld or stand mixer will give you that smooth cream cheese filling without a workout.
With your tools ready, it’s time to gather your ingredients!
Ingredients for Rice Krispie Treat Cheesecake
Here’s what you’ll need for this delicious recipe:
- 3 cups Rice Krispies cereal
- 1/4 cup butter
- 1 package (10 oz) marshmallows
- 2 packages (8 oz each) cream cheese, softened
- 1 cup powdered sugar
- 1 teaspoon vanilla extract
- 1 cup heavy whipping cream
Did you notice that list isn’t super long? That’s part of the charm!
How to Make Rice Krispie Treat Cheesecake at Home
Alright, let’s get cooking! Here’s your step-by-step guide. Just follow along:
- Melt the Butter: In a saucepan, melt the butter over low heat. Add marshmallows and stir until completely melted. Remove from heat.
- Mix with Rice Krispies: Stir in the Rice Krispies until they’re well coated. You want to ensure every crispy piece gets that lovely marshmallow goodness.
- Press into the Pan: Firmly press the mixture into the bottom of a greased 9-inch springform pan to form your crust. Make sure it’s well-packed—trust me, a loose crust will crumble later.
- Cream Cheese Filling: In a mixing bowl, beat the cream cheese until smooth. Add the powdered sugar and vanilla. Beat until well combined. You’ll want this to be super creamy.
- Whip the Cream: In another bowl, whip the heavy cream until stiff peaks form. Gently fold the whipped cream into the cream cheese mixture. This step gives your cheesecake that airy texture.
- Combine & Spread: Pour the cheesecake filling over the Rice Krispie crust and spread it evenly. This is the moment your dessert starts to look heavenly!
- Chill Out: Refrigerate for at least 4 hours or until set. Honestly, this is the hardest part! The wait is tough.
- Release & Serve: Once it’s set, release the springform pan, slice, and serve!
Quick tip: don’t rush this step. Letting it chill properly makes all the difference!
Pro Tips for Best Results
- Don’t Rush the Cooling: This cheesecake thickens more as it cools. If you cut it too soon, you might end up with a gooey mess.
- Mixing Technique: When you’re folding in the whipped cream, be gentle. You’re aiming for light and fluffy, not liquidy.
- Storage: Store leftover cheesecake in the fridge, and it should last about three days—if it lasts that long!
Variations & Customization Ideas
Feeling adventurous? Here are a few fun twists you can make:
- Chocolate Drizzle: Add a chocolate ganache on top for extra flair.
- Nutty Crunch: Toss in some chopped nuts for added texture. Almonds work beautifully!
- Fruit Topping: Add fresh berries on top before serving for a pop of color and freshness.
Common Mistakes to Avoid
There are a few pitfalls to be aware of:
- Not Greasing the Pan: This might lead to a sticky situation when trying to release the cheesecake.
- Over-melting: Be cautious with the heat when melting butter and marshmallows. Stir often, so it doesn’t stick to the pan.
Ever had this happen? I’ve had a few mishaps over the years, so learn from my experience!
What to Serve With Rice Krispie Treat Cheesecake
This cheesecake is delightful on its own, but you can jazz it up with a few extras:
- Whipped Cream: A dollop on top never hurts.
- Coffee or Tea: The perfect drink pairing to cut through the richness.
- Fresh Fruit: Berries or sliced fruit make for a fresh contrast.
Storage & Reheating Instructions
Keep your Rice Krispie Treat Cheesecake wrapped tightly in the fridge. It’ll stay fresh for about three days. No need to reheat—just serve it cold.
Estimated Nutrition Information
- Calories: 350 per slice (approx.)
- Fat: 25g
- Carbohydrates: 30g
- Protein: 5g
Keep in mind these values can vary based on your specific ingredients.
FAQs
-
Can I use a different cereal?
Yes! Feel free to experiment, but Rice Krispies give that perfect crunch. -
How long does it take to set?
At least 4 hours. Overnight is even better! -
Can I freeze this cheesecake?
While you can freeze it, the texture might change a bit upon thawing. -
What if I can’t find marshmallows?
You might try using marshmallow fluff instead, but it will need some adjusting for the buttery flavor. -
Can I use low-fat cream cheese?
You can, but it might change the texture and flavor slightly.
Expert Tips for the Best Rice Krispie Treat Cheesecake
One thing I noticed is that this cheesecake tastes even better the next day. The flavors meld perfectly overnight.
So, if you can wait, let it chill longer!
Conclusion
If you’re ready for a dessert that’s sure to impress, this Rice Krispie Treat Cheesecake is your answer. This Rice Krispie Treat Cheesecake recipe is perfect for quick meals, easy snacks, or special occasions. So go ahead, save this recipe for later and let me know how it turns out! You are going to love it—trust me!
Print
Rice Krispie Treat Cheesecake
- Total Time: 265 minutes
- Yield: 8 servings 1x
- Diet: Vegetarian
Description
A delightful dessert combining the nostalgic crunch of Rice Krispies with the creamy goodness of cheesecake.
Ingredients
- 3 cups Rice Krispies cereal
- 1/4 cup butter
- 1 package (10 oz) marshmallows
- 2 packages (8 oz each) cream cheese, softened
- 1 cup powdered sugar
- 1 teaspoon vanilla extract
- 1 cup heavy whipping cream
Instructions
- Melt the butter in a saucepan over low heat. Add marshmallows and stir until completely melted. Remove from heat.
- Mix in the Rice Krispies until they’re well coated.
- Press the mixture into the bottom of a greased 9-inch springform pan.
- Cream together the cream cheese until smooth. Add the powdered sugar and vanilla, then beat until well combined.
- Whip the heavy cream in another bowl until stiff peaks form. Gently fold it into the cream cheese mixture.
- Combine the cheesecake filling with the Rice Krispie crust and spread it evenly.
- Chill in the refrigerator for at least 240 minutes or until set.
- Release the springform pan, slice, and serve.
Notes
Let the cheesecake chill properly for the best texture. Store leftovers in the fridge for up to three days.
- Prep Time: 15 minutes
- Cook Time: 15 minutes
- Category: Dessert
- Method: Chilling
- Cuisine: American
Nutrition
- Serving Size: 1 slice
- Calories: 350
- Sugar: 20g
- Sodium: 300mg
- Fat: 25g
- Saturated Fat: 15g
- Unsaturated Fat: 5g
- Trans Fat: 0g
- Carbohydrates: 30g
- Fiber: 0g
- Protein: 5g
- Cholesterol: 60mg