
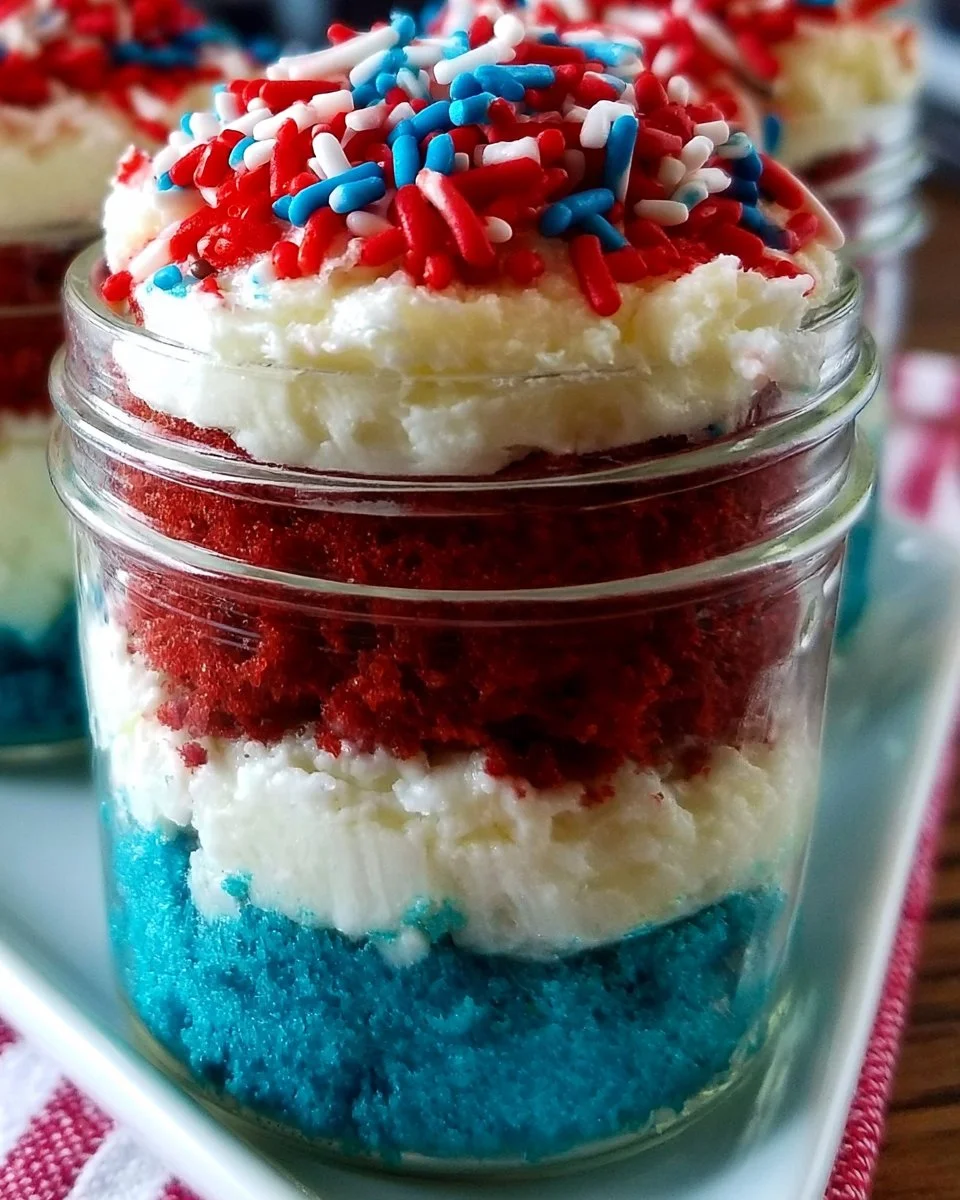
Delight in the 4th of July Cake in a Jar
When it comes to celebrating the 4th of July, nothing quite captures the spirit like a festive dessert. The 4th of July Cake in a Jar is not only an eye-catching treat, but it also adds a fun twist to your typical cake—trust me, you’ll be blown away by how delightful each bite is! I remember the first time I made these sweet cups of joy for a backyard barbecue. The kids squealed with joy as they dug in, and honestly, the adults were right there with them.
So, let’s chat about why this treat is such a game changer for your summer celebrations.
Why You’ll Love This 4th of July Cake in a Jar
This 4th of July Cake in a Jar combines a few layers of cake and frosting that create a beautiful layered effect. You’ll get lovely red, white, and blue layers that are as tasty as they are pretty!
Easy to Make
You don’t need to be a pastry chef to whip this up. Just follow a few simple steps, and you’ll have a dessert that looks impressive!
Perfect for Sharing
These jars are easy to serve, and everyone gets their own little portion. There’s no fussing with slices, and you won’t have to worry about cake crumbs getting everywhere.
Customizable
Want to switch it up? Use your favorite cake flavors or mix up the decorations. The possibilities are endless which means you’ll never get bored!
Preparation Phase & Tools to Use
Before diving in, gather a few tools for this recipe:
- Mixing bowls
- Whisk or electric mixer
- Baking tray
- Jars or cups for serving
And that’s honestly about it! Super simple, right?
Ingredients for 4th of July Cake in a Jar
Here’s what you’ll need:
- 1 box of cake mix (red velvet, vanilla, or any preferred flavor)
- Eggs (as required by cake mix instructions)
- Oil (as required by cake mix instructions)
- Water (as required by cake mix instructions)
- Creamy frosting (store-bought or homemade)
- Red and blue food coloring
- Sprinkles (optional for decoration)
Fun tip: You can use flavored frosting for an extra kick!
How to Make 4th of July Cake in a Jar at Home
Let’s get to the good part—the making! Here’s how to do it step-by-step:
- Preheat the oven and bake the cake according to the package instructions. Let it cool completely. This part is important, so don’t rush it!
- Once the cake has cooled, crumble it into small pieces. Play around with the texture; I usually aim for a mix of big and small crumbles for visual interest.
- Prepare the jars by adding a layer of cake crumbles, followed by a layer of frosting. I like to use a piping bag for the frosting to make it look a bit fancier, but it’s not necessary.
- Repeat the layers until each jar is filled, finishing off with a lovely dollop of frosting on top.
- To decorate, use food coloring to dye some of the frosting red or blue, if desired. It’s fun to get creative here!
- Lastly, top with sprinkles or fresh fruit for an extra festive touch.
- Serve chilled and enjoy your patriotic dessert!
Keep reading, because there’s more to explore…
Pro Tips for Best Results
- Stir often while mixing your cake batter to incorporate air, making that cake fluffy.
- Consider the timing. You might need an extra minute or two in the oven depending on your specific model.
- Make sure to let the cake cool completely—warm cake can melt your frosting, which is not ideal!
Variations & Customization Ideas
Feeling adventurous?
- Swap out the cake mix for lemon or chocolate to create an entirely different flavor.
- Instead of sprinkles, add fresh berries or chocolate chips for a unique texture.
- Use mini jars for a bite-sized version perfect for little hands.
Common Mistakes to Avoid
- Don’t skip cooling: This is a mistake I’ve made before, and the result was a melty mess. Trust me on this!
- Be careful with food coloring: A little goes a long way. Start with a drop and add more if needed.
- If you’re using homemade frosting, make sure it’s cool enough. Warm frosting can get runny and messy.
What to Serve With 4th of July Cake in a Jar
Looking for pairings? These jars go wonderfully with:
- Grilled hot dogs or burgers—you can never go wrong here.
- A refreshing summer salad like a watermelon feta combo.
- Homemade ice cream, if you want to ramp up your dessert game.
Storage & Reheating Instructions
Store any leftovers in the fridge for up to 3 days, although my family usually finishes these off in one day! If they start getting a bit soggy, simply enjoy them fresh the next day for that same fun texture and flavor.
Estimated Nutrition Information
While the exact numbers will vary based on your ingredients, here’s a rough idea per serving:
- Calories: ~250
- Fat: 10g
- Carbohydrates: 35g
- Protein: 2g
It’s a sweet indulgence, but totally worth it for special occasions!
FAQs
-
Can I use store-bought cake?
- Yes! Just crumble it and layer it up in the jars.
-
How far in advance can I make these?
- You can prepare them up to a day ahead of your event. Just keep them covered in the fridge.
-
What if I don’t have jars?
- Use cups or even small bowls. Presentation is key, but containers can be flexible!
-
Can I make this gluten-free?
- Absolutely! Just choose a gluten-free cake mix, and you’re good to go.
-
Can kids help with this recipe?
- Yes! It’s a fun active kitchen project for them. Just supervise during baking.
Expert Tips for the Best 4th of July Cake in a Jar
- Layer it up: Aim for a variety of sizes in your cake crumbles for more texture.
- Balance flavors: If the cake is sweet, consider using a tangy frosting like cream cheese.
- Have fun!: Let your creativity shine, especially with toppings and colors.
Conclusion
So there you have it—the delightful 4th of July Cake in a Jar. This recipe is perfect for quick meals, easy snacks, or special occasions. Have fun with it! Whether you keep it simple or go all out with decorations, these jars are sure to steal the show at your next gathering. Don’t forget to save this recipe for later or try it and see how it turns out!
And hey, if you’re interested in more easy meal ideas, check out my posts on easy dinner recipes and quick breakfast recipes. Happy baking!
Print
4th of July Cake in a Jar
- Total Time: 45 minutes
- Yield: 8 servings 1x
- Diet: Vegetarian
Description
A festive and delicious layered cake served in jars, perfect for summer celebrations and easy sharing.
Ingredients
- 1 box of cake mix (red velvet, vanilla, or any preferred flavor)
- Eggs (as required by cake mix instructions)
- Oil (as required by cake mix instructions)
- Water (as required by cake mix instructions)
- Creamy frosting (store-bought or homemade)
- Red and blue food coloring
- Sprinkles (optional for decoration)
Instructions
- Preheat the oven and bake the cake according to the package instructions. Let it cool completely.
- Crumble the cake into small pieces.
- Add a layer of cake crumbles to each jar, followed by a layer of frosting.
- Repeat the layers until each jar is filled, finishing with frosting on top.
- Decorate with dyed frosting and sprinkles or fresh fruit.
- Serve chilled and enjoy your dessert!
Notes
Stir often while mixing cake batter for fluffiness. Ensure the cake cools completely to prevent melting the frosting.
- Prep Time: 15 minutes
- Cook Time: 30 minutes
- Category: Dessert
- Method: Baking
- Cuisine: American
Nutrition
- Serving Size: 1 jar
- Calories: 250
- Sugar: 20g
- Sodium: 250mg
- Fat: 10g
- Saturated Fat: 3g
- Unsaturated Fat: 4g
- Trans Fat: 0g
- Carbohydrates: 35g
- Fiber: 1g
- Protein: 2g
- Cholesterol: 30mg