
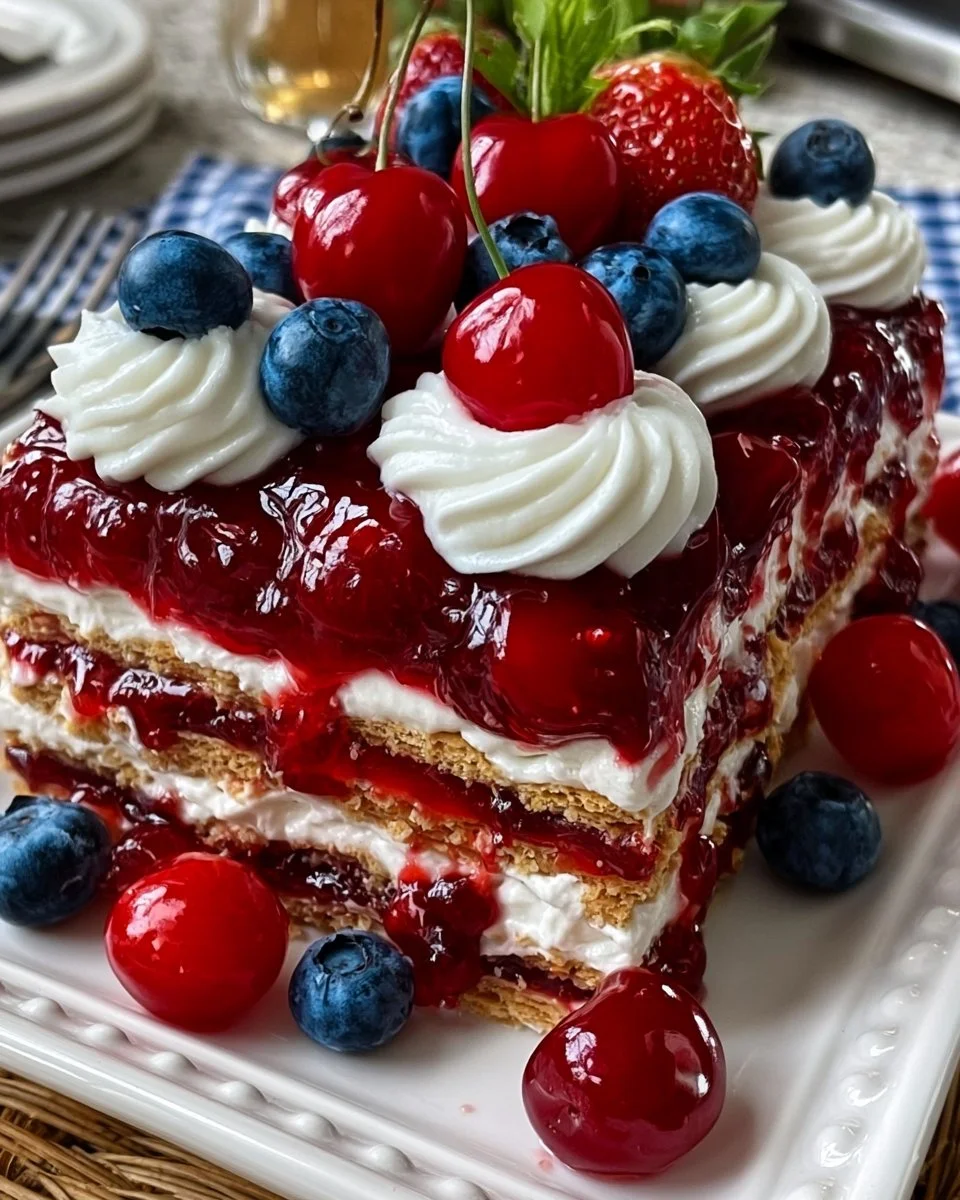
A No-Bake 4th of July Cherry Cheesecake Icebox Cake You’ll Love
If you’re looking for a dessert that screams summer vibes and is just perfect for celebrating the 4th of July, the No-Bake 4th of July Cherry Cheesecake Icebox Cake is the one for you! I first whipped this up a couple of years ago when I had friends over for a backyard barbecue. Honestly, I wanted something festive, easy, and delicious, and this dessert ticked all the boxes. We devoured it in minutes, leaving nothing but the empty dish behind. You’ll see what I mean when you make it!
This No-Bake 4th of July Cherry Cheesecake Icebox Cake not only has wonderful layers of creamy cheesecake filling and sweet cherry topping, but it’s also super easy to put together, making it a fantastic choice for BBQs, picnics, and holiday gatherings. Plus, it looks so pretty with those vibrant colors – you’ll definitely want to show it off!
Why You’ll Love This No-Bake 4th of July Cherry Cheesecake Icebox Cake
Let’s be honest: who wouldn’t love a dessert that requires no baking? That alone saves you time and worry about oven mishaps!
The combination of graham crackers, whipped cream, and cream cheese creates a smooth, satisfying texture that melts in your mouth. Then, you get the delightful burst of the cherry pie filling that’s just perfect for summer celebrations. And let’s not forget the red, white, and blue decorations! They make this dessert not just yummy but visually festive too.
Remember, this recipe is all about layers. Each bite offers a delicious contrast between the creamy cheesecake, crunchy graham crackers, and sweet cherries. It’s truly a crowd-pleaser! So grab your ingredients, and let’s dive right into making this showstopper.
Preparation Phase & Tools to Use
Before you start, make sure you have the following tools on hand:
- A rectangular baking dish or an 8×8 inch square dish
- Mixing bowls (you’ll need at least two)
- A hand or stand mixer
- A spatula for folding
- Measuring cups and spoons
Having everything ready makes the process smoother. Trust me, you don’t want to be scrambling for things halfway through!
Ingredients for No-Bake 4th of July Cherry Cheesecake Icebox Cake
To get you started, here’s what you’ll need:
- Graham Crackers: About 2 cups crushed, for that lovely base and crunch
- Cream Cheese: 1 package, softened, to give that rich creamy flavor
- Sugar: 1/2 cup, to sweeten the cream cheese just right
- Vanilla Extract: 1 teaspoon, for a natural, warm flavor
- Heavy Cream: 2 cups, to whip into fluffy goodness
- Cherry Pie Filling: 1 can, for those irresistible juicy cherry layers
- Red, White, and Blue Decorations: Think blueberries and strawberries for garnish!
How to Make No-Bake 4th of July Cherry Cheesecake Icebox Cake at Home
Here’s where the magic happens! Ready? Let’s break it down step by step.
-
Beat the Cream Cheese: In a mixing bowl, beat the softened cream cheese, sugar, and vanilla extract until it’s super smooth. This takes about 2-3 minutes. You want it fluffy.
-
Whip the Cream: In another bowl, whip the heavy cream until you get stiff peaks. This should take about 3-5 minutes. Don’t rush this step! If you overbeat, it can turn grainy.
-
Fold It Together: Gently fold the whipped cream into the cream cheese mixture. Here’s a tip: make sure to do this carefully to keep that airy texture. If you stir too hard, it might deflate.
-
Layer the Ingredients: In your rectangular dish, start laying down the graham crackers. A single layer will do. Then spread a layer of the cheesecake filling over it, followed by a layer of cherry pie filling. Repeat! You’ll want to finish with a cherry topping layer on top.
-
Decorate: After layering, add your red, white, and blue toppings. It looks beautiful and so festive!
-
Chill Out: Refrigerate for at least 4 hours, or overnight if you can wait that long. The longer it chills, the better it sets.
-
Serve: Finally, when you’re ready to enjoy, slice it up and serve chilled.
It’s a straightforward process. And guess what? There’s no baking stress involved here!
Pro Tips for Best Results
- Use room temperature cream cheese: It mixes in more smoothly, trust me.
- Experiment with flavors: Swap out cherry pie filling for blueberries or strawberries—get creative!
- Make it the day before: This No-Bake 4th of July Cherry Cheesecake Icebox Cake tastes even better after a night in the fridge.
Variations & Customization Ideas
Want to switch things up? Here are some ideas you can try:
- Use flavored whipped cream: Vanilla or almond flavored whipped cream could spice things up a bit.
- Add nuts: A sprinkle of crushed nuts in between layers adds a nice crunch.
- Different fruits: Try this with fresh fruit that matches your theme—like mango or peach for a tropical twist.
Common Mistakes to Avoid
- Don’t skip chilling: If you serve this too soon, it won’t hold its shape. So yeah, patience is key here!
- Overmixing the cream: As I mentioned earlier, be gentle when folding the cream. It really makes a difference.
- Not measuring accurately: Just eyeballing ingredients can lead to inconsistency. Grab those measuring cups!
What to Serve With No-Bake 4th of July Cherry Cheesecake Icebox Cake
This dessert stands alone, but if you want to make a meal out of it, consider pairing it with:
- Grilled meats (ever had it after a juicy burger?)
- Fresh summer salads like a classic Caesar or a fruity spinach salad
- Lemonade or iced tea for that refreshing summer drink vibe
Storage & Reheating Instructions
You can store your No-Bake 4th of July Cherry Cheesecake Icebox Cake covered in the fridge for about 3-4 days. Just make sure it’s airtight! Honestly, this dessert is best enjoyed cold, so there’s really no need to reheat it.
Estimated Nutrition Information
For a generous slice, you’re looking at approximately:
- Calories: 320
- Fat: 18g
- Carbohydrates: 40g
- Protein: 6g
These numbers can vary based on the specific brands and ingredients, so just keep that in mind.
FAQs
1. Can I use low-fat cream cheese?
Yes! It alters the taste a bit, but it can work.
2. How long does it take to set?
You should let it chill for at least 4 hours.
3. Is it possible to freeze this cake?
You can freeze it, but the texture might change. Best to eat it fresh!
4. Can I use homemade whipped cream instead?
Absolutely! Just make sure you stabilize it if you want it to last longer.
5. What other toppings can I use?
You can use chocolate shavings, crushed cookies, or even sprinkles!
Expert Tips for the Best No-Bake 4th of July Cherry Cheesecake Icebox Cake
- Keep the cream cold: When working with heavy cream, ensure it stays chilled.
- Use fresh fruit for decoration: Freshly sliced strawberries or blueberries look amazing on top!
- Adjust sweetness: If you prefer a lighter taste, feel free to cut down the sugar a bit.
Conclusion
So there you have it! The No-Bake 4th of July Cherry Cheesecake Icebox Cake is a fantastic, easy-to-make dessert that will impress your friends and family. It’s perfect for quick meals, easy snacks, or special occasions. The layers of sweetness and creaminess will have everyone reaching for seconds.
I can’t wait for you to try this recipe and share it with your loved ones. Save this recipe for later, and enjoy every sweet bite. Happy baking (or should I say “no-baking”?)!
Print
No-Bake 4th of July Cherry Cheesecake Icebox Cake
- Total Time: 240 minutes
- Yield: 8 servings 1x
- Diet: Vegetarian
Description
A festive and easy-to-make dessert featuring layers of creamy cheesecake and sweet cherry topping, perfect for summer celebrations.
Ingredients
- 2 cups crushed Graham Crackers
- 1 package Cream Cheese, softened
- 1/2 cup Sugar
- 1 teaspoon Vanilla Extract
- 2 cups Heavy Cream
- 1 can Cherry Pie Filling
- Red, White, and Blue Decorations (blueberries and strawberries for garnish)
Instructions
- Beat the cream cheese, sugar, and vanilla extract until super smooth (2-3 minutes).
- Whip the heavy cream until stiff peaks form (3-5 minutes).
- Fold the whipped cream into the cream cheese mixture gently.
- Layer the graham crackers in a rectangular dish, followed by cheesecake filling and cherry pie filling. Repeat and finish with cherry topping.
- Decorate with red, white, and blue toppings.
- Chill in the refrigerator for at least 240 minutes or overnight.
- Serve chilled by slicing it up.
Notes
Use room temperature cream cheese for easier mixing. Experiment with different pie fillings for a twist.
- Prep Time: 15 minutes
- Cook Time: 0 minutes
- Category: Dessert
- Method: No-Bake
- Cuisine: American
Nutrition
- Serving Size: 1 slice
- Calories: 320
- Sugar: 20g
- Sodium: 350mg
- Fat: 18g
- Saturated Fat: 10g
- Unsaturated Fat: 6g
- Trans Fat: 0g
- Carbohydrates: 40g
- Fiber: 1g
- Protein: 6g
- Cholesterol: 30mg