
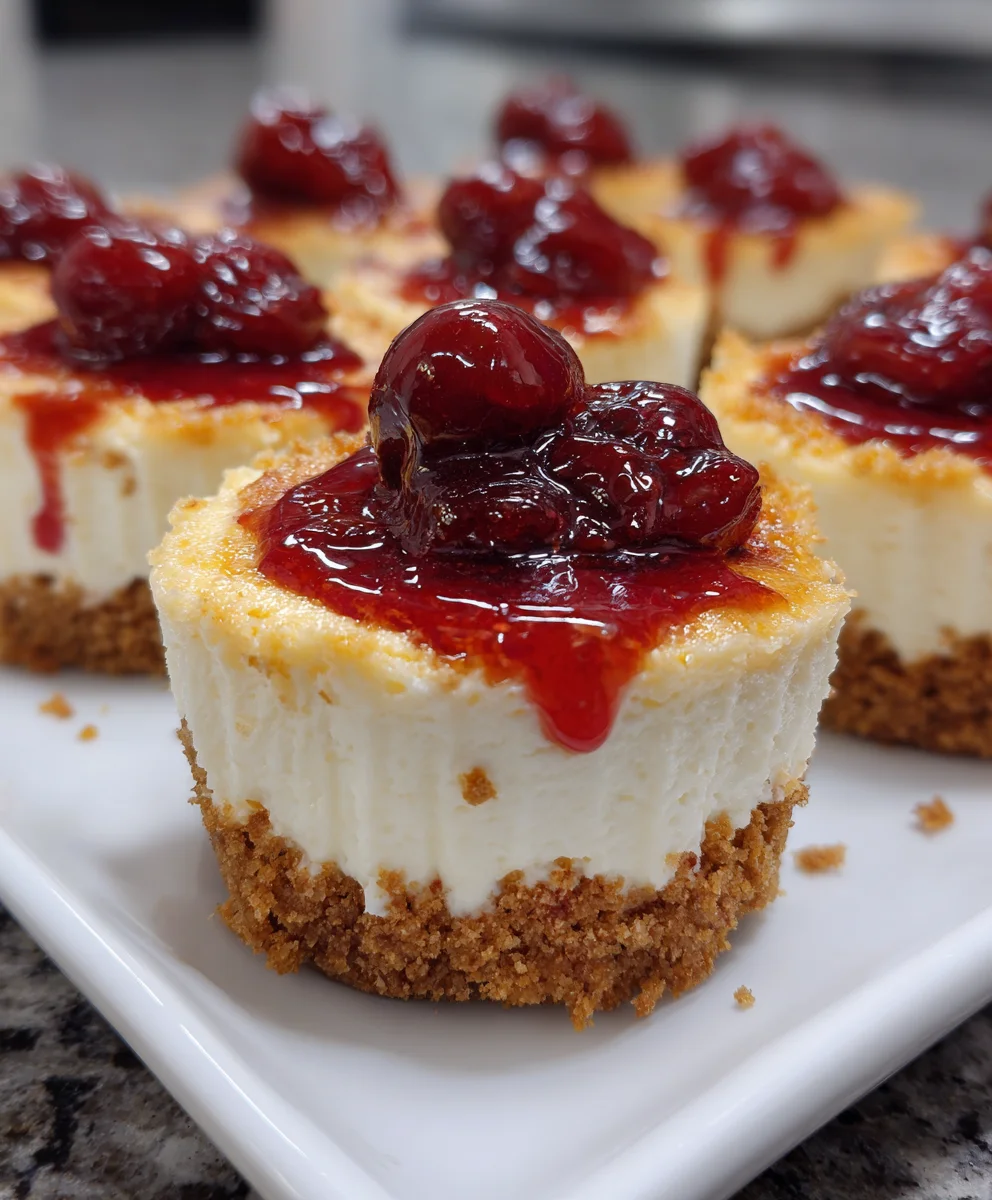
Introduction to Mini Cherry Cheesecakes
myself, I completely understand the struggle of finding time to create delightful desserts. That’s where these Mini Cherry Cheesecakes come in. They’re not just adorable little bites but also a quick solution for any day or occasion. Picture this: a creamy filling nestled in a crumbly crust, topped with luscious cherry pie filling. It’s an impressive treat that’ll wow your loved ones without taking all night in the kitchen. So, grab your apron, and let’s whip up some joy, one mini cheesecake at a time!
Why You’ll Love This Mini Cherry Cheesecakes
These Mini Cherry Cheesecakes are the ultimate crowd-pleasers. They’re so easy to make, which is a lifesaver for anyone with a packed schedule. Each little cheesecake delivers a heavenly burst of flavor that dances on your tongue. Plus, they can be made ahead of time, making them perfect for parties or a sweet surprise after dinner. Trust me, you’ll love every bite!
Ingredients for Mini Cherry Cheesecakes
Gathering the right ingredients is crucial for the success of these Mini Cherry Cheesecakes. Here’s what you’ll need:
- Vanilla wafer crumbs: These serve as the delicious, crunchy base. You can use crushed graham crackers if you prefer a different flavor.
- Unsalted butter: This adds richness and binds the wafer crumbs together. Make sure it’s melted for easy mixing.
- Cream cheese: The star of the show! Ensure it’s softened to achieve that smooth, creamy texture we all love.
- Granulated sugar: This sweetens the filling. You can adjust this based on your sweetness preference or substitute with a sugar alternative.
- Pure vanilla extract: It brings out all the flavors and adds a lovely aroma.
- Egg: This helps set the cheesecake as it bakes, creating a luxurious consistency.
- Egg yolk: Adds richness and enhances the creamy texture, making each bite decadent.
- Sour cream: It contributes a bit of tanginess to balance the sweetness and keep the filling moist.
- Cherry pie filling: The delightful topping that crowns these cheesecakes. You can also use fresh cherries for a lighter option.
For exact quantities, scroll down to the bottom of the article where you can find the full recipe available for printing. Let’s get started on creating these delightful cheesecakes!
How to Make Mini Cherry Cheesecakes
Preheat and Prepare
Let’s start by warming up that oven! Preheat it to 325°F (163°C), so it’s nice and toasty when we’re ready to bake. Line a 12-cup muffin pan with paper liners. This makes it easy to pop out your Mini Cherry Cheesecakes. Trust me, that little step is a lifesaver. You want to avoid any sticky situations. You’re almost on your way to a decadent treat!
Create the Crust
Next up, let’s create that delightful crust. In a mixing bowl, combine your vanilla wafer crumbs with melted butter. Mix until everything is evenly moistened. This is where the magic starts! Once combined, divide the crust mixture among the muffin liners, pressing firmly into the base. Baking the crusts for 5 to 7 minutes gives them a lovely, golden touch that’ll hold your cheesecake filling perfectly.
Make the Cheesecake Filling
Now, onto the star of the show—the cheesecake filling. In a large bowl, using an electric mixer, beat the softened cream cheese and granulated sugar until it’s smooth. Make sure to scrape down the sides of the bowl as needed. Add in the vanilla extract, whole egg, egg yolk, and sour cream, mixing until everything is blended well and silky. The smoother the filling, the creamier the final product will be. You want that heavenly texture!
Fill the Crusts
It’s time to fill those beautiful crusts! Spoon the cheesecake filling over the pre-baked crusts, filling each liner nearly to the top. Don’t worry if it looks a bit high; it will settle during baking. Each bite of your Mini Cherry Cheesecakes will be an explosion of flavor. This is where excitement builds—you’re just a few minutes away from baking your treats to perfection!
Bake to Perfection
Pop your muffin pan in the preheated oven and bake for 20 to 25 minutes. The centers should be set and no longer jiggle. It’s crucial not to overbake. This keeps your cheesecake lush and creamy. When you pull them out, they’ll still have a little shimmy to them, which is a sign they’re just right! Time to let them cool down before the next delicious step!
Cool and Chill
After baking, set the pan on a wire rack to cool completely. Once they’re cool, place them in the refrigerator for at least 2 hours, or until fully chilled. This chilling time helps enhance the flavors and texture, giving you a delightful crunch when you bite in. Trust me, the wait is worth it. As the cheesecakes chill, they become even more irresistible!
Tips for Success
- Make sure all ingredients are at room temperature for a smoother mix.
- Use a rubber spatula to scrape down the bowl while mixing for a consistent texture.
- Don’t overbake—the centers should have a slight jiggle for that perfect creamy finish.
- Allow your cheesecakes to chill completely in the fridge for the best flavor.
- For a fun twist, try different toppings like chocolate or fresh fruit!
Equipment Needed
- Muffin pan: A standard 12-cup muffin pan works best. A silicone pan is a great alternative for easy removal.
- Mixing bowls: Use any size, but have one large bowl for the filling.
- Electric mixer: A handheld mixer is ideal, but you can use a whisk for a workout!
- Rubber spatula: Perfect for scraping down the bowl and filling the crusts smoothly.
Variations on Mini Cherry Cheesecakes
- Chocolate Swirl: Add melted chocolate to the cheesecake filling for a rich, chocolatey twist. Just fold it in gently before spooning into the crusts.
- Fruit Medley: Swap out cherry pie filling for other fruits like blueberry, strawberry, or even a mix for a colorful and refreshing treat.
- Gluten-Free Version: Use gluten-free cookie crumbs for the crust instead of vanilla wafers. It’s just as delicious!
- Healthy Option: Substitute sugar with a natural sweetener like honey or maple syrup, and use reduced-fat cream cheese to lighten it up.
- No-Bake Variation: Skip the baking step by setting the cheesecakes in the fridge with whipped cream folded into the filling for a lighter texture.
Serving Suggestions for Mini Cherry Cheesecakes
- Pair with a dollop of whipped cream for added decadence and a pop of color.
- Serve alongside a fresh fruit salad for a refreshing contrast to the rich cheesecake.
- For drinks, a light sparkling wine or iced tea complements the desserts beautifully.
- Garnish with mint leaves for a touch of freshness and visual appeal.
- Arrange on a decorative platter to make an eye-catching presentation at your next gathering.
FAQs about Mini Cherry Cheesecakes
Can I make Mini Cherry Cheesecakes ahead of time?
Absolutely! These Mini Cherry Cheesecakes can be made a day in advance. Just store them in the refrigerator until you’re ready to serve. This makes them a perfect option for busy moms or anyone with a packed schedule!
How do I store leftovers?
To keep your cheesecakes fresh, store any leftovers in an airtight container in the fridge. They should last for up to five days, but I doubt they’ll be around that long!
Can I freeze Mini Cherry Cheesecakes?
Yes, you can freeze them! Just make sure to wrap each cheesecake individually in plastic wrap and place them in a container. They’ll be good for about two months. Just thaw them in the fridge overnight before enjoying!
What can I use instead of cherry pie filling?
If cherries aren’t your thing, feel free to get creative! You can use fresh fruits like strawberries, blueberries, or even a chocolate ganache. The versatility of this cheesecake recipe lets your imagination run wild!
Is this recipe suitable for kids?
Definitely! Who wouldn’t love a small cheesecake? Plus, it’s a fun treat to make together. Just keep an eye on the mixing part, and let them help with the toppings. They’ll love being mini-chefs!
Final Thoughts
Creating these Mini Cherry Cheesecakes is more than just baking; it’s about making memories! Each little bite is packed with creamy goodness and bursts of sweet cherry, making it a perfect treat for any occasion. Whether it’s a family gathering, a potluck, or just a weeknight dessert, these cheesecakes are sure to bring smiles all around. Plus, the ease of preparation gives you more time to enjoy with loved ones. So go ahead, dive into this sweet adventure, and delight in the joy that comes from sharing your creations with others!
Print
Mini Cherry Cheesecakes
- Total Time: 2 hours 50 minutes (includes cooling time)
- Yield: 12 mini cheesecakes 1x
- Diet: Vegetarian
Description
Mini Cherry Cheesecakes are delightful, bite-sized desserts with a creamy filling and a sweet cherry topping.
Ingredients
- 1 cup vanilla wafer crumbs
- 3 tablespoons unsalted butter, melted
- 8 ounces cream cheese, softened
- 3/4 cup granulated sugar
- 1 teaspoon pure vanilla extract
- 1 large egg
- 1 large egg yolk
- 1/2 cup sour cream
- 1 cup cherry pie filling
Instructions
- Preheat the oven to 325°F (163°C). Line a 12-cup muffin pan with paper liners.
- Combine vanilla wafer crumbs with melted butter in a mixing bowl. Mix until evenly moistened.
- Evenly divide the crust mixture among the paper liners, pressing firmly into the base of each cup. Bake for 5 to 7 minutes until just set and lightly golden. Remove from oven and allow to cool slightly.
- In a large bowl, beat softened cream cheese and sugar with an electric mixer on medium speed until smooth. Scrape down the sides as needed.
- Add vanilla extract, whole egg, egg yolk, and sour cream to the cream cheese mixture. Blend until fully incorporated and no lumps remain.
- Spoon the cheesecake filling over the pre-baked crusts, filling each liner nearly to the top.
- Bake for 20 to 25 minutes, or until the centers are set and no longer jiggle. Do not overbake.
- Remove the pan from the oven and set on a wire rack. Let the cheesecakes cool completely in the pan, then refrigerate for at least 2 hours or until fully chilled.
- Before serving, top each mini cheesecake with a generous spoonful of cherry pie filling.
Notes
- Ensure that all ingredients are at room temperature before starting for a smoother mixture.
- Don’t overbake to maintain a creamy texture.
- These can be prepared a day in advance and stored in the refrigerator.
- Prep Time: 20 minutes
- Cook Time: 30 minutes
- Category: Dessert
- Method: Baking
- Cuisine: American
Nutrition
- Serving Size: 1 mini cheesecake
- Calories: 250
- Sugar: 15g
- Sodium: 210mg
- Fat: 12g
- Saturated Fat: 7g
- Unsaturated Fat: 3g
- Trans Fat: 0g
- Carbohydrates: 30g
- Fiber: 1g
- Protein: 3g
- Cholesterol: 45mg