
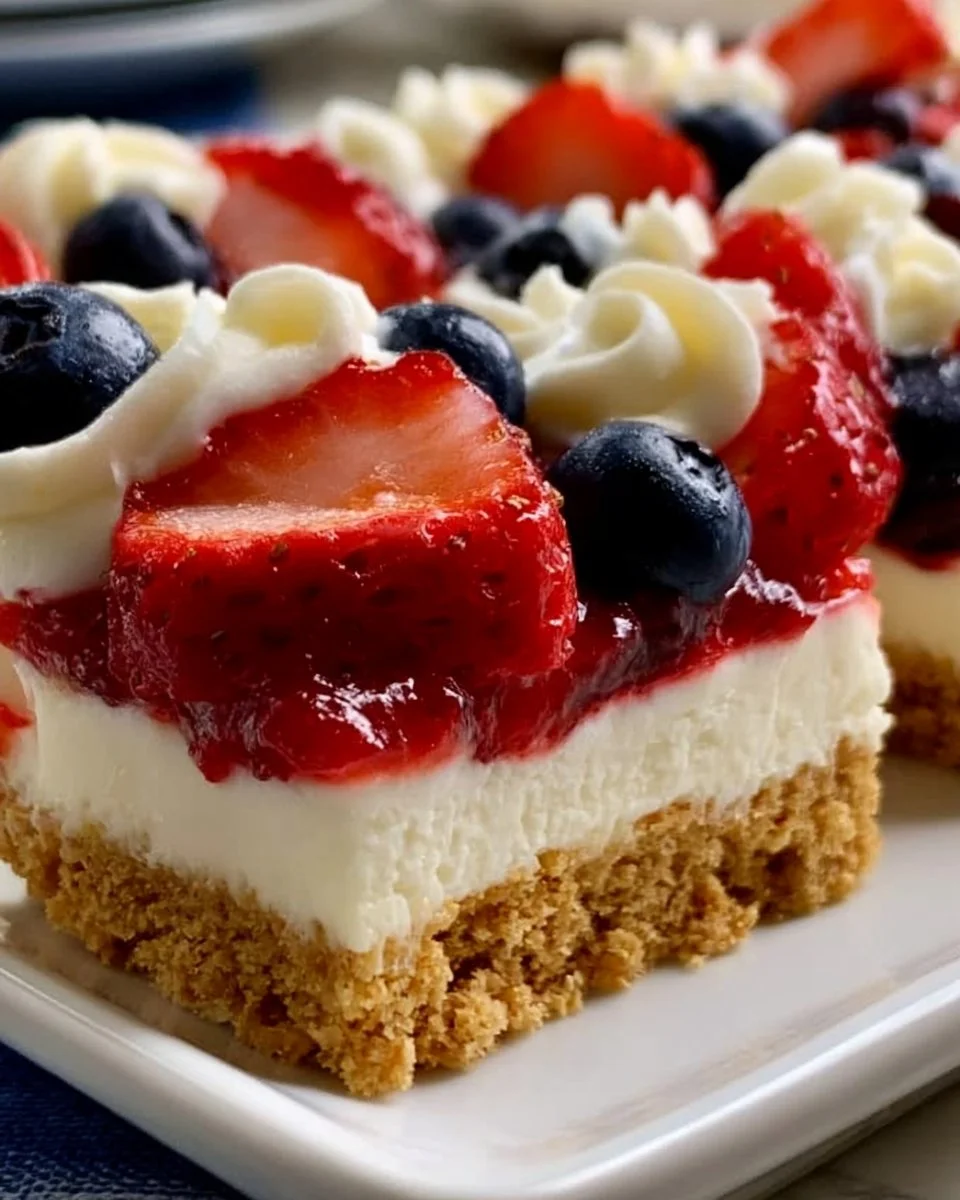
No-Bake Flag Cheesecake Bars are simply delightful! I remember the first time I made these for a summer barbecue. The sun was shining, friends were gathered, and I wanted something festive and easy to whip up. Let me tell you, these bars were gone in no time! They not only look stunning but also taste like a slice of heaven. Trust me, you’re going to want to add this No-Bake Flag Cheesecake Bars recipe to your collection.
Why You’ll Love This No-Bake Flag Cheesecake Bars
These No-Bake Flag Cheesecake Bars are perfect for warm weather gatherings or any occasion that calls for a touch of Americana. You’re going to love how simple they are to make and how effortlessly impressive they look when you serve them. Honestly, it’s like a patriotic dessert that everyone can enjoy, from kids to adults. Plus, they’re super creamy, thanks to the whipped topping and cream cheese, and the fruity topping adds a fresh burst of flavor. It’s a win-win!
A Unique Spin on Traditional Cheesecake
Whether you’re a cheesecake lover or not, there’s something about these bars that just draws you in. They’re not just rich and creamy; they’re also refreshing thanks to the strawberries and blueberries. And since they’re no-bake, you don’t need to worry about heating up the kitchen during those hot summer months.
So yeah, let’s dive in and make these delicious treats!
Preparation Phase & Tools to Use
Before we jump into the ingredients, here are a couple of things you’ll need:
- A 9×13 inch baking dish
- Mixing bowls
- Hand mixer or stand mixer
- Spatula
- Measuring cups and spoons
Ingredients for No-Bake Flag Cheesecake Bars
Gather these tasty ingredients before you start:
- 8 oz cream cheese, softened
- 1 cup powdered sugar
- 1 tsp vanilla extract
- 2 cups whipped topping
- 1 cup graham cracker crumbs
- 1/2 cup butter, melted
- 2 cups fresh strawberries, sliced
- 1 cup fresh blueberries
Keep these ingredients handy, and we’ll get started!
How to Make No-Bake Flag Cheesecake Bars at Home
-
Make the Crust: In a bowl, mix the graham cracker crumbs and melted butter until everything is combined. It’s super crumbly, but that’s okay! Press this mixture into the bottom of your greased 9×13 inch pan to form a solid crust.
-
Prepare the Filling: In another bowl, beat the softened cream cheese until it’s smooth. Add the powdered sugar and vanilla extract, mixing until it’s well blended. You want it light and fluffy, so take your time here!
-
Fold in the Topping: Now, fold in the whipped topping gently until everything is combined. Be careful not to overmix; you want to keep that lovely lightness in the mixture.
-
Spread the Cheesecake Layer: Pour the cheesecake mixture evenly over the crust you made earlier. Spread it out evenly, making sure every bit of crust is covered.
-
Decorate: Arrange the sliced strawberries and blueberries on top to form a beautiful American flag design. Seriously, don’t worry if it’s not perfect—just have fun with it!
-
Chill: Refrigerate for at least 2-4 hours until set. This is key. I’ve rushed this step before, and it just didn’t hold together as well as it should!
-
Serve: Once chilled, cut them into beautiful bars and serve them chilled. Your friends and family will be amazed!
Pro Tips for Best Results
- Let the cream cheese warm up: It’s easier to mix when it’s softened. Take it out of the fridge about 30 minutes before you start.
- Don’t rush the chilling step: This is crucial for the bars to hold their shape. If you can, let them chill overnight—good things come to those who wait!
- Try not to skip the lining: Greasing the pan helps the bars come out easily.
Variations & Customization Ideas
You can really get creative with this recipe! Here are some ideas:
-
Fruit Alternatives: Swap strawberries and blueberries for other fruits like raspberries or even peaches.
-
Flavor Boosts: Add a dash of lemon or almond extract for a fun twist.
-
Chocolate Drizzle: Drizzle some melted chocolate on top for a decadent touch. Who can resist chocolate?
Common Mistakes to Avoid
-
Overmixing the Filling: This can cause your cream cheese to become too dense. Be gentle when folding in the whipped topping.
-
Not Enough Chilling Time: If you don’t chill long enough, they might not set, and you’ll end up with a gooey mess instead of neat bars. Been there, done that!
What to Serve With No-Bake Flag Cheesecake Bars
These bars pair perfectly with a scoop of vanilla ice cream or a dollop of whipped cream on the side. For drinks, consider serving them with lemonade or sweet tea. They’re also great at potlucks and barbecues!
Storage & Reheating Instructions
You can store these No-Bake Flag Cheesecake Bars in an airtight container in the refrigerator for up to 4-5 days. Just note that the longer they sit, the softer they might become, so enjoy them fresh!
Estimated Nutrition Information
While I won’t break down every calorie, you can expect a lovely balance of flavorful goodness without too much guilt. Just remember to enjoy these in moderation!
FAQs
1. Can I make these bars a day in advance?
Absolutely! In fact, they taste even better when they’ve had time to chill.
2. What if I can’t find graham cracker crumbs?
You can use crushed cookies like Oreo or digestive biscuits as a substitute.
3. How do I know when they’re set?
They should be firm to the touch and hold their shape when cut.
4. How can I make it gluten-free?
Use gluten-free graham crackers for the crust.
5. Can I freeze these bars?
Yes! Just make sure to cover them well, and they should keep for about a month in the freezer.
Expert Tips for the Best No-Bake Flag Cheesecake Bars
Keep it simple and don’t overthink it. The best part of cooking is enjoying the process and the final product with friends and family. These bars are supposed to be fun and festive!
Conclusion
So there you have it! This No-Bake Flag Cheesecake Bars recipe is perfect for quick meals, easy snacks, or special occasions. They’re simple, delicious, and make for a beautiful presentation. Save this recipe for later, and I can’t wait for you to try it. Happy baking! Or, should I say, happy no-baking!
If you’re looking for other easy treats, check out my quick breakfast recipes or dive into some healthy recipes for balanced meals. Enjoy!
Print
No-Bake Flag Cheesecake Bars
- Total Time: 255 minutes
- Yield: 12 servings 1x
- Diet: Vegetarian
Description
Delightfully refreshing no-bake cheesecake bars topped with colorful strawberries and blueberries, perfect for summer gatherings.
Ingredients
- 8 oz cream cheese, softened
- 1 cup powdered sugar
- 1 tsp vanilla extract
- 2 cups whipped topping
- 1 cup graham cracker crumbs
- 1/2 cup butter, melted
- 2 cups fresh strawberries, sliced
- 1 cup fresh blueberries
Instructions
- Make the crust: In a bowl, mix the graham cracker crumbs and melted butter until everything is combined. Press this mixture into the bottom of your greased 9×13 inch pan to form a solid crust.
- Prepare the filling: In another bowl, beat the softened cream cheese until it’s smooth. Add the powdered sugar and vanilla extract, mixing until it’s well blended.
- Fold in the topping: Gently fold in the whipped topping until everything is combined.
- Spread the cheesecake layer: Pour the cheesecake mixture evenly over the crust. Spread it out evenly.
- Decorate: Arrange the sliced strawberries and blueberries on top to form an American flag design.
- Chill: Refrigerate for at least 120-240 minutes until set.
- Serve: Once chilled, cut into bars and serve.
Notes
Let the cream cheese warm up before mixing for easier blending. Don’t rush the chilling step to ensure bars hold their shape.
- Prep Time: 15 minutes
- Cook Time: 240 minutes
- Category: Dessert
- Method: No-Bake
- Cuisine: American
Nutrition
- Serving Size: 1 bar
- Calories: 250
- Sugar: 12g
- Sodium: 200mg
- Fat: 12g
- Saturated Fat: 7g
- Unsaturated Fat: 5g
- Trans Fat: 0g
- Carbohydrates: 33g
- Fiber: 1g
- Protein: 3g
- Cholesterol: 25mg