
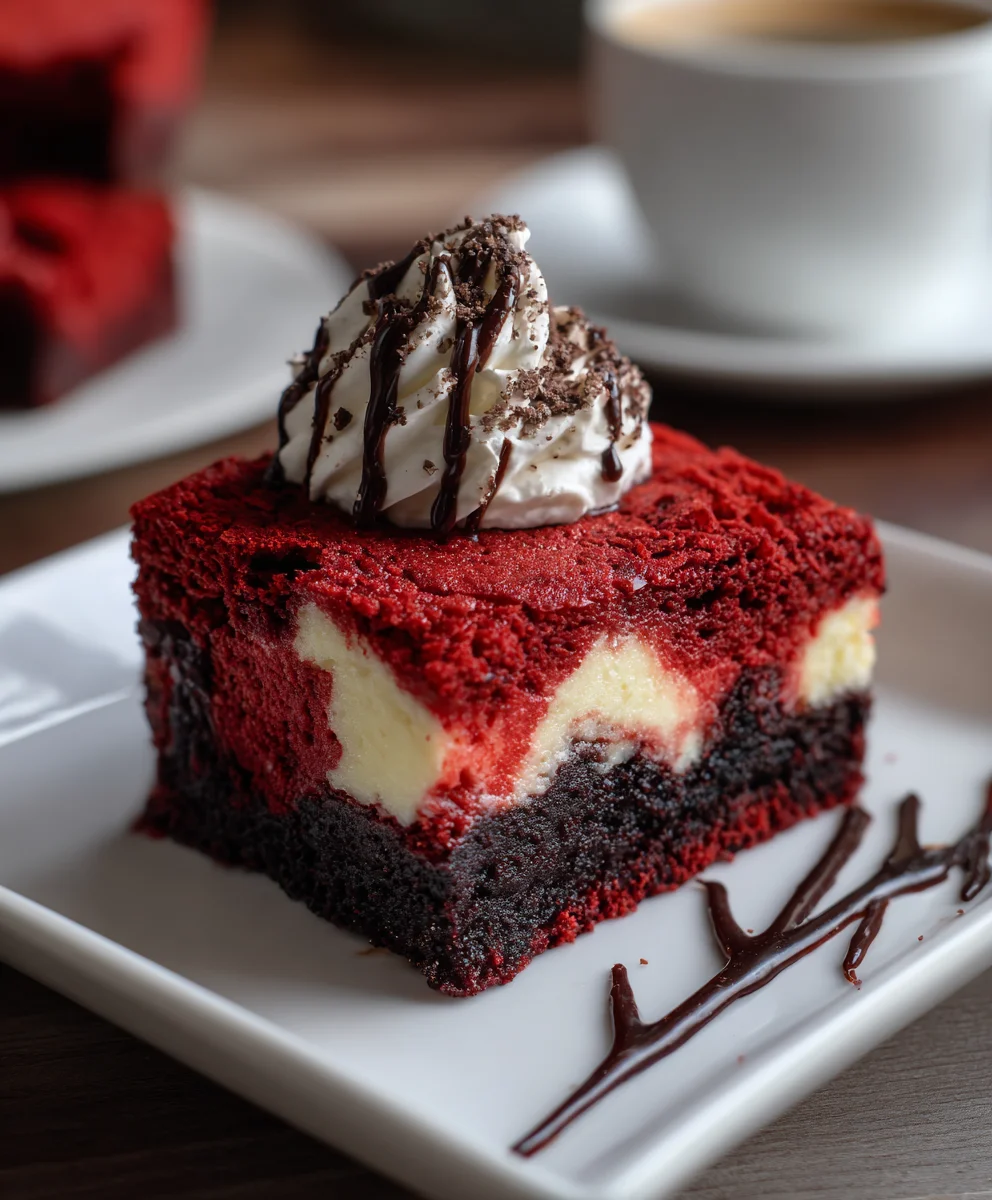
Introduction to Red Velvet Cheesecake Brownies
Ah, the blissful world of desserts! If you find yourself swept away in the chaos of daily life, these Red Velvet Cheesecake Brownies are the ultimate indulgent escape. Picture this: a rich, velvety brownie interlaced with a creamy cheesecake layer that melts in your mouth. Whether it’s a quiet evening at home or a gathering with loved ones, this decadent treat is here to please. It’s easy, quick, and oh-so-rewarding. Trust me, your family will gather around the kitchen, eagerly awaiting these delightful brownies that promise to bring smiles and sweet satisfaction!
Why You’ll Love This Red Velvet Cheesecake Brownies
These Red Velvet Cheesecake Brownies are a game-changer for busy moms like me. They combine the charm of classic red velvet with the rich texture of cheesecake, delivering a treat that’s delicious and impressive. Plus, they come together in just about an hour, making them a perfect sweet solution for unexpected guests or a midnight craving. You’ll not only save time but also create something your loved ones will adore!
Ingredients for Red Velvet Cheesecake Brownies
Let’s explore the star players in these heavenly Red Velvet Cheesecake Brownies. Each ingredient adds a layer of flavor and texture that makes these brownies a sure winner. Here’s what you’ll need:
- Butter: The foundation of flavor, butter adds richness to the brownies.
- Sugar: A must for that delightful sweetness, balancing the cocoa and cheesecake layers.
- Cocoa Powder: It gives the brownies their chocolatey depth, melting perfectly into the mix.
- Red Food Coloring: An absolute essential! This gives the brownies that signature red velvet hue.
- Vanilla Extract: A dash of this adds warmth and boosts the overall flavor profile.
- White Vinegar: Surprising but effective! It reacts with baking soda for tenderness and a touch of tang.
- Eggs: These bind all the ingredients together, ensuring a lovely texture in every bite.
- All-Purpose Flour: This is the glue for the brownies, providing structure while keeping them soft.
- Salt: Often overlooked, salt is crucial. It enhances flavors and balances sweetness.
- Cream Cheese: The creamy centerpiece of your cheesecake layer, making it velvety and indulgent.
- Egg Yolk: This helps enrich the cheesecake filling, resulting in a smoother texture.
For those looking to switch things up, consider using brown sugar for added depth or opting for gluten-free flour if needed. Remember, the exact measurements are listed at the bottom of the article for your convenience. Happy baking!
How to Make Red Velvet Cheesecake Brownies
Step 1: Preheat and Prepare the Pan
Let’s get that oven fired up! Preheat it to 350°F (175°C) while you prepare your baking pan. Grab an 8×8 inch pan and either line it with parchment paper or grease it thoroughly. This little preparation step ensures your brownies won’t stick and makes for easy cleanup.
Step 2: Mix the Red Velvet Base
Now, let’s whip up the star of the show! In a medium bowl, combine melted butter, sugar, and cocoa powder. Add the vibrant red food coloring to make it pop, followed by the vanilla extract and white vinegar for that zing. It’s time to crack in those eggs, mixing one at a time, until smooth and well combined. Gradually fold in the flour and salt, being careful not to overmix. Reserve a delicious 1/4 cup of this red velvet batter for the top later. Trust me, the swirls will be worth it!
Step 3: Prepare the Cream Cheese Mixture
In a separate bowl, it’s time to create that dreamy cheesecake layer. Blend cream cheese until it’s creamy and smooth, ensuring there are no lumps. Add sugar for sweetness and mix in the egg yolk, along with the remaining vanilla extract. This mixture should feel light and velvety. You want it to be easy to spread over your brownie base, so make sure it’s well combined and luscious.
Step 4: Assemble the Layers
Let’s build our delicious masterpiece! Start by spreading the red velvet brownie batter evenly across the bottom of your prepared pan. Carefully layer the smooth cream cheese mixture on top, ensuring full coverage. Now, take that reserved brownie batter and dollop it over the cheesecake layer. With a toothpick or knife, gently swirl it to create a beautiful marbled effect. It’s like creating art, but edible!
Step 5: Bake to Perfection
Time to let your kitchen smell amazing! Bake the brownies for 30–35 minutes or until the edges are set and the center has a slight jiggle. Keep an eye on it; you want it cooked but not dried out. Let them cool completely in the pan on a wire rack. Patience is key here!
Tips for Success
- Make sure your ingredients are at room temperature for smoother mixing.
- For a deeper flavor, consider using brown sugar instead of white sugar.
- Don’t skip the salt; it enhances the sweetness and balances the flavors.
- Swirling the brownie batter gently keeps the cheesecake layer beautifully marbled.
- Let the brownies cool completely before slicing for clean edges.
Equipment Needed
- 8×8 inch Baking Pan: You can use a 9×9 inch pan if needed.
- Mixing Bowls: A medium and a small bowl will do the trick.
- Whisk and Spatula: Alternatively, a fork and spoon can help mix ingredients.
- Measuring Cups and Spoons: Use a kitchen scale if you prefer precise measurements.
- Parchment Paper or Cooking Spray: This ensures easy removal of brownies from the pan.
Variations on Red Velvet Cheesecake Brownies
- Nutty Delight: Add chopped pecans or walnuts to the brownie layer for a crunchy texture that complements the softness.
- Chocolate Chips: Stir in semi-sweet or dark chocolate chips into the brownie base for an extra chocolatey kick.
- Gluten-Free Option: Substitute all-purpose flour with a gluten-free blend to cater to dietary needs.
- Red Velvet Cupcakes: Transform the batter into cupcakes for individual servings, just adjust baking time.
- Coconut Cream Cheese: Mix shredded coconut into the cheesecake layer for a tropical twist.
Serving Suggestions for Red Velvet Cheesecake Brownies
- Pair these brownies with a scoop of vanilla ice cream for an indulgent treat.
- Drizzle with chocolate or cream cheese frosting for added sweetness and flair.
- Serve with a dollop of whipped cream and fresh strawberries for a refreshing contrast.
- A cup of hot coffee or tea makes the perfect beverage companion.
- For a fun presentation, sprinkle powdered sugar on top before serving.
FAQs about Red Velvet Cheesecake Brownies
Can I make these brownies ahead of time?
Absolutely! These Red Velvet Cheesecake Brownies store beautifully. Just cover them tightly and keep them in the refrigerator for up to a week. They taste amazing cold, but you can also warm them slightly in the microwave.
What if I don’t have red food coloring?
If you’re in a pinch, you can make a chocolate cheesecake brownie instead. Simply skip the food coloring and enjoy a rich, chocolatey treat that’s just as delicious!
Can I use low-fat cream cheese for the cheesecake layer?
Yes, substituting low-fat cream cheese works well. The texture might be slightly different, but the taste will still shine through. It’s a great way to cut some calories while still indulging.
How can I make these brownies more festive?
You can easily dress up these brownies for special occasions by adding sprinkles or heart-shaped decorations on top. They make a lovely treat for Valentine’s Day or other celebrations!
What’s the best way to store leftover brownies?
Store any leftovers in an airtight container at room temperature for up to 3 days or refrigerate for up to a week. For longer storage, consider freezing individual squares. They’ll be a sweet surprise later on!
Final Thoughts
These Red Velvet Cheesecake Brownies are more than just a dessert; they’re a moment of joy amidst life’s hustle. Imagine the smiles of your family as they savor each bite of creamy, chocolaty goodness. This recipe not only satisfies your sweet cravings but also creates memories in the kitchen. Whether you share them with friends or keep them all to yourself, these brownies are a reminder that life is meant to be enjoyed. So grab your apron and indulge in this delightful treat that is as fun to make as it is to eat!
Print
Red Velvet Cheesecake Brownies
- Total Time: 60 minutes
- Yield: 16 squares 1x
- Diet: Vegetarian
Description
Indulge in the rich and decadent Red Velvet Cheesecake Brownies, combining the classic flavors of red velvet and a creamy cheesecake layer.
Ingredients
- 1/2 cup Butter
- 1 cup Sugar
- 1/4 cup Cocoa Powder
- 1 tablespoon Red Food Coloring
- 1 teaspoon Vanilla Extract
- 1 teaspoon White Vinegar
- 2 large Eggs
- 1 cup All-Purpose Flour
- 1/2 teaspoon Salt
- 8 ounces Cream Cheese
- 1 large Egg Yolk
Instructions
- Preheat your oven to 350°F (175°C) and prepare an 8×8 inch baking pan by lining it with parchment paper or greasing it well.
- In a medium bowl, whisk together melted butter, sugar, cocoa powder, red food coloring, vanilla extract, and white vinegar. Add eggs one at a time, incorporating each until smooth. Gently fold in flour and salt until just combined, reserving 1/4 cup of this batter for swirling.
- In a separate bowl, blend the cream cheese, sugar, egg yolk, and remaining vanilla extract until creamy and well combined.
- Spread the prepared brownie batter evenly across the bottom of the baking pan. Layer the cheesecake mixture on top uniformly. Dollop the reserved brownie batter over the cheesecake layer and swirl gently with a toothpick to create a marbled effect.
- Bake the brownies for 30–35 minutes until the edges are set and the center has a slight jiggle. Allow to cool completely before slicing into squares.
- Optional: Dust with powdered sugar for a sweet finish before serving.
Notes
- Brown sugar can enhance flavor depth.
- Use pure vanilla extract for best results.
- Ensure eggs are at room temperature for better mixing.
- Do not omit the salt as it balances flavors.
- Prep Time: 20 minutes
- Cook Time: 30–35 minutes
- Category: Dessert
- Method: Baking
- Cuisine: American
Nutrition
- Serving Size: 1 square
- Calories: 250
- Sugar: 20g
- Sodium: 150mg
- Fat: 14g
- Saturated Fat: 8g
- Unsaturated Fat: 4g
- Trans Fat: 0g
- Carbohydrates: 30g
- Fiber: 1g
- Protein: 3g
- Cholesterol: 50mg