
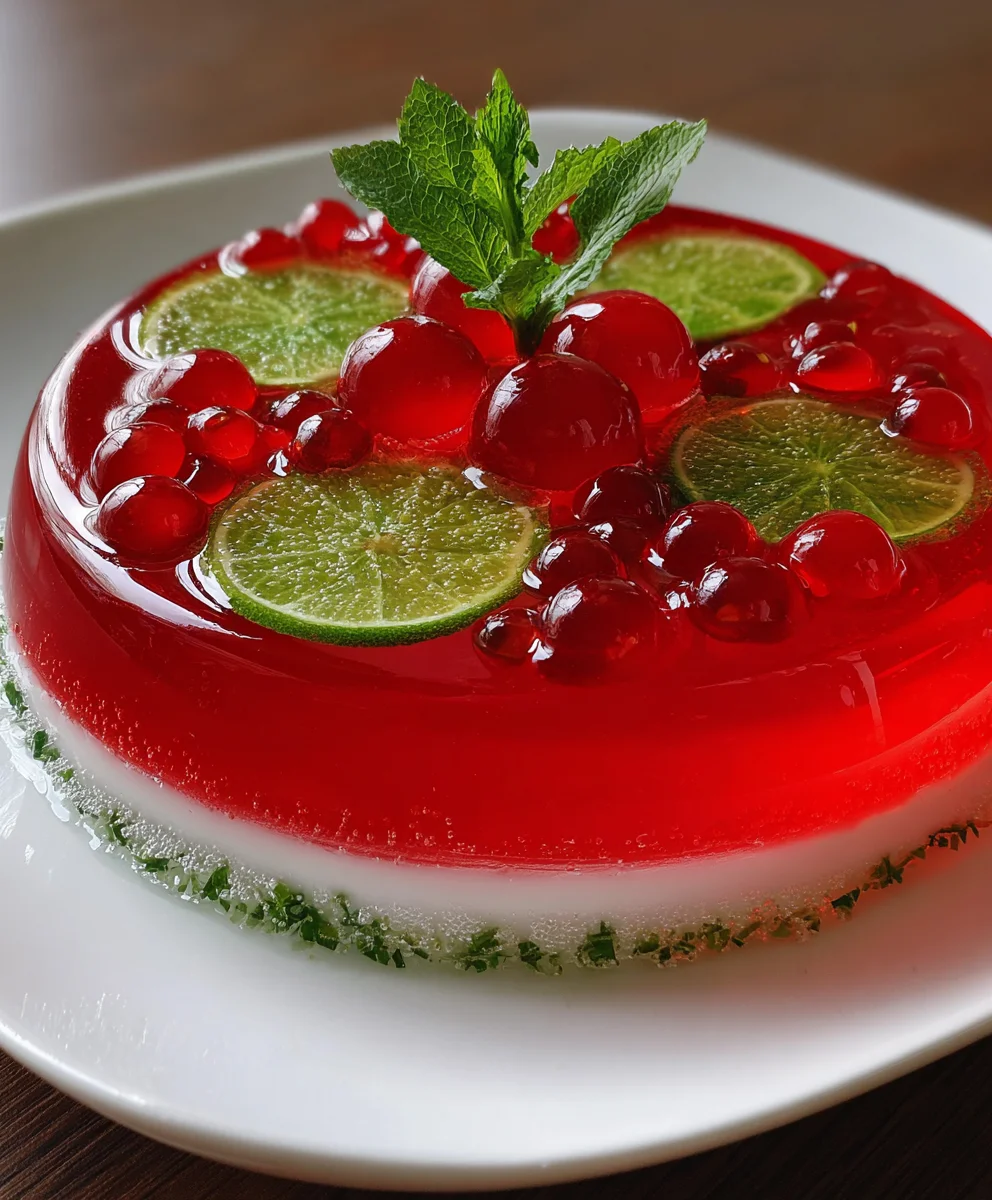
Introduction to Easy Layered Christmas Jello
As the holiday season rolls around, my kitchen bursts with joy, and nothing spreads cheer quite like my Easy Layered Christmas Jello. This delightful dessert is not only vibrant and eye-catching, but it’s also a quick solution for those bustling days filled with festivities. It’s all about layering flavors that dance on your taste buds—cherry and lime gelatins lovingly embracing a creamy middle. A bite of this colorful treat can impress your loved ones while bringing a sense of nostalgia, reminding me of family gatherings filled with laughter. Trust me; this jello will become a classic!
Why You’ll Love This Easy Layered Christmas Jello
This Easy Layered Christmas Jello is a holiday game-changer! It’s unbelievably simple to whip up, even for those of us with hectic schedules. The refreshing taste of cherry and lime, combined with the creamy layer, creates a delightful experience with every bite. Plus, it’s visually stunning, making it a perfect centerpiece for your holiday table. Your family and friends will rave about it, and you’ll relish the compliments!
Ingredients for Easy Layered Christmas Jello
Gathering the right ingredients is part of the fun when making my Easy Layered Christmas Jello! You’ll need a delightful mix of fruity and creamy elements for this festive treat:
- Cherry flavored gelatin powder: This is where the sweet, nostalgic flavor begins. It’s the vibrant red layer that brings the festive spirit.
- Lime flavored gelatin powder: This packs a zingy punch that contrasts beautifully with the cherry and adds a refreshing twist to the dessert.
- Unflavored gelatin: This acts like a magic binder for our creamy layer, ensuring it sets perfectly and adds a nice texture.
- Sweetened condensed milk: The secret ingredient! It creates the creamy layer that harmonizes the flavors, lending a touch of sweetness that is hard to resist.
- Boiling and cold water: You’ll need both types to dissolve the gelatin and set our layers. Make sure your boiling water is piping hot; it’s key for proper mixing!
- Optional ingredients: Feel free to add festive garnish like whipped cream or fresh berries before serving for added flair.
For precise measurements, check the bottom of the article for a handy printable list. Happy cooking!
How to Make Easy Layered Christmas Jello
Now that you’ve gathered the ingredients, it’s time to roll up your sleeves and make this festive masterpiece! The process might seem like a holiday project, but it’s actually quite straightforward. Follow these simple steps, and before you know it, you’ll have an irresistible treat that steals the show!
Step 1 – Prepare the Cherry Layer
Start by dissolving the cherry gelatin powder in 240 ml of boiling water. Stir vigorously to ensure it’s fully mixed—no clumps allowed! Then, add 120 ml of cold water. This mixture will be the first vibrant layer in your Easy Layered Christmas Jello. Pour it into a 23×33 cm glass dish, and place it in the fridge. Let it set for about 30–45 minutes, or until it’s firm enough for the next layer. Patience is key here!
Step 2 – Bloom the Unflavored Gelatin
While the cherry layer sets, it’s time to bloom the unflavored gelatin. Sprinkle it gently over 120 ml of cold water in a small bowl. Allow it to sit for 5 minutes. This step is like giving the gelatin a nice little nap, prepping it for action. After blooming, pour in 360 ml of boiling water and stir until it’s completely dissolved. It’s all about those smooth textures!
Step 3 – Create the Creamy Layer
Next up, we’ll blend in the star of the show—sweetened condensed milk! Mix it into your dissolved unflavored gelatin until fully combined. Make sure it’s cool enough before pouring it over the chilled cherry layer. This gentle transition keeps the layers intact, allowing for those beautiful distinct lines.
Step 4 – Combine the Layers
Carefully pour the creamy mixture onto the set cherry layer, and place it back in the refrigerator. Let it chill until it’s firm, which usually takes about an hour. It’s like a little cooling session in the refrigerator before the grand finale!
Step 5 – Make the Lime Layer
Now for the zesty twist! Dissolve the lime gelatin powder in 240 ml of boiling water, just like you did with the cherry layer. Stir until fully dissolved, then add 120 ml of cold water. Allow this mixture to cool slightly; we don’t want to ruin those beautiful layers! Carefully pour it over the set creamy layer.
Step 6 – Final Assembly
Once the lime layer is added, let it refrigerate until completely set, which will take about an hour. I recommend playing some holiday tunes and sipping on some cocoa while you wait. It’ll be worth it when you see this festive beauty come together!
Step 7 – Serve and Enjoy
When the jello has set, it’s time for the big reveal! Remove the glass dish from the fridge and cut it into delightful squares. You can serve it chilled, and for a special touch, add a dollop of whipped cream or a sprinkle of fresh berries on top. Your Easy Layered Christmas Jello is ready for all to enjoy!
Tips for Success
- Always let each layer set completely before adding the next. This ensures beautiful, distinct layers.
- Make this Easy Layered Christmas Jello a day ahead. It only gets better with time!
- Use a sharp knife to cut neat squares and make serving easier.
- Experiment with flavor combinations—try orange or pineapple for a fun twist!
- Store leftovers, if any, in an airtight container to keep it fresh.
Equipment Needed
- Glass dish: A 23×33 cm dish works best, but any similar-sized dish will do!
- Mixing bowls: Use standard mixing bowls for combining ingredients. If you don’t have these, any deep bowl will suffice.
- Measuring cups: Adjustable measuring cups are key, though you can use any standard cups as a substitute.
- Whisk or spoon: A whisk helps with blending, but a sturdy spoon works just fine.
- Refrigerator: Essential for setting those layers! A chill is what we need.
Variations
- Flavor Swaps: Try orange or raspberry gelatin to change up the flavors while keeping that festive vibe.
- Healthy Option: Use sugar-free gelatin in place of regular gelatin for a lighter version that doesn’t compromise on taste.
- Dairy-Free Twist: Substitute the sweetened condensed milk with coconut cream for a delightful dairy-free treat!
- Add Fruits: Incorporate diced fruits like strawberries or kiwi between layers for extra texture and flavor.
- Layered Cake: Transform this recipe into a cake by layering it between sponge cake for a fun twist at your holiday gathering.
Serving Suggestions for Easy Layered Christmas Jello
- Pair with a light, festive salad to balance the sweetness.
- Serve alongside hot cocoa or a sparkling holiday drink for a delightful contrast.
- Present on a decorative platter, garnished with fresh mint or holly for a stunning holiday display.
- For an extra touch, offer whipped cream and berries on the side.
FAQs about Easy Layered Christmas Jello
Can I make Easy Layered Christmas Jello in advance?
Absolutely! In fact, making it a day ahead is often best. The layers need time to set properly, plus it allows flavors to meld for a more delightful experience.
Can I use different flavors of gelatin?
Yes! This recipe is versatile. You can swap cherry and lime with your favorite flavors, like raspberry and orange. Just ensure the colors contrast nicely for that festive vibe.
How do I store leftovers?
If you happen to have leftovers, store them in an airtight container in the refrigerator. They’ll stay fresh and ready to impress your guests with a sweet surprise!
What should I do if my layers aren’t distinct?
If the layers blend, it might be because one layer was too warm when poured over another. Always allow each layer to cool slightly before adding the next one to keep those distinct sections!
Can I make this dessert vegan?
Yes! You can use plant-based gelatin and replace sweetened condensed milk with coconut cream or another dairy-free alternative. It keeps the festive charm while catering to dietary needs.
Final Thoughts
Creating this Easy Layered Christmas Jello has become a cherished holiday tradition in my home. It’s not just a dessert; it’s a celebration of family, color, and flavor that brings everyone together. Each layer tells a story—of laughter, love, and the hustle and bustle of the season. Watching eyes light up as they taste that creamy, fruity delight reminds me of why I love to cook. So, whether you’re bringing it to a gathering or enjoying it at home, this jello will surely add a sprinkle of joy to your holiday festivities!
Print
Easy Layered Christmas Jello
- Total Time: 1 hour 35 minutes
- Yield: 8 servings 1x
- Diet: Vegetarian
Description
Easy Layered Christmas Jello is a delightful and colorful holiday dessert that features layers of cherry and lime gelatin combined with a creamy sweetened condensed milk layer.
Ingredients
- 85 g cherry flavoured gelatin powder
- 85 g lime flavoured gelatin powder
- 2 packets unflavoured gelatin
- 397 g sweetened condensed milk
- 475 ml boiling water, divided
- 237 ml cold water, divided
- 120 ml cold water (for blooming gelatin)
Instructions
- Dissolve the cherry gelatin powder in 240 ml boiling water, stirring thoroughly. Incorporate 120 ml cold water. Pour into a 23×33 cm glass dish and refrigerate until fully set, approximately 30–45 minutes.
- Evenly sprinkle unflavoured gelatin over 120 ml cold water in a bowl. Allow to bloom for 5 minutes. Add 360 ml boiling water, stirring to dissolve completely.
- Blend sweetened condensed milk into the dissolved gelatin mixture. Allow to cool slightly to avoid melting the red layer.
- Gently pour the milk mixture onto the set red gelatin layer. Refrigerate until firm.
- Dissolve lime gelatin powder in 240 ml boiling water. Add 120 ml cold water and cool slightly.
- Carefully pour the cooled green gelatin over the set white layer. Refrigerate until completely set, about 1 hour.
- Cut into squares and serve chilled.
Notes
- Make sure to allow each layer to fully set before adding the next to achieve distinct layers.
- This dessert can be made a day in advance for convenience.
- Prep Time: 20 minutes
- Cook Time: 15 minutes
- Category: Dessert
- Method: Refrigeration
- Cuisine: American
Nutrition
- Serving Size: 1 square
- Calories: 150
- Sugar: 20g
- Sodium: 30mg
- Fat: 2g
- Saturated Fat: 1g
- Unsaturated Fat: 1g
- Trans Fat: 0g
- Carbohydrates: 30g
- Fiber: 0g
- Protein: 3g
- Cholesterol: 5mg