
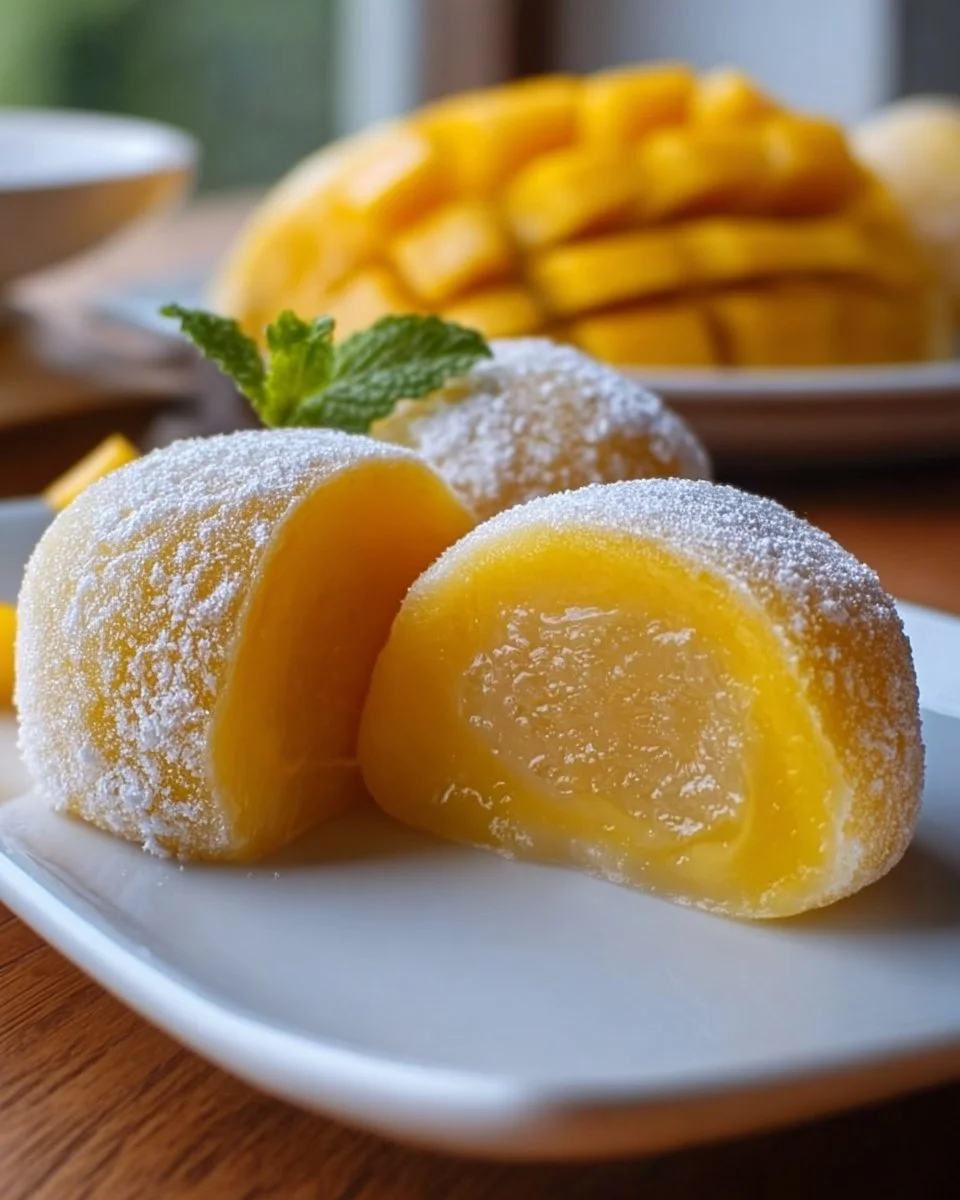
Homemade Mango Mochi is a delightful treat that brings a burst of tropical sweetness right into your kitchen. I remember the first time I made it—I was feeling adventurous one hot summer day, and I had a ripe mango sitting on my counter, just waiting to be used. Honestly, what could be better than combining that juicy goodness with the chewy texture of mochi? So here we go, and you’ll see just how easy and fun it is to make this delicious dessert!
Why You’ll Love This Homemade Mango Mochi
Homemade Mango Mochi is not only a fantastic way to enjoy fresh mangoes, but each bite offers a lovely combination of chewy sweetness and fruity flavor. Trust me, you won’t want to stop at just one! It’s incredibly versatile too. This recipe is perfect for quick meals, easy snacks, or special occasions, like birthdays or cozy summer get-togethers.
Another thing I love about this mochi is how fun it is to make. You can get creative with the shapes and fillings! Plus, it’s gluten-free—thanks to the sweet rice flour—so everyone can enjoy it.
Preparation Phase & Tools to Use
Before we dive into making this mochi magic happen, let’s take a peek at what you’ll need.
-
Tools: You’ll need a mixing bowl, a microwave-safe dish, plastic wrap, and a clean surface for dusting. Oh, and a knife if you’re adding fresh slices of mango inside!
-
Time: All in all, you need about 15-20 minutes for preparation and cooking. So, yeah, it’s a quick process.
Now let’s gather our ingredients!
Ingredients for Homemade Mango Mochi
- 1 cup sweet rice flour (mochi flour)
- 1 cup ripe mango puree
- 1/4 cup sugar
- 1/2 cup water
- Potato starch or cornstarch (for dusting)
- Mango slices (optional, for filling—because, why not?)
How to Make Homemade Mango Mochi at Home
Creating your own Homemade Mango Mochi is surprisingly simple. Just follow these easy steps:
-
Mixing Time: In a medium bowl, mix the sweet rice flour, sugar, and water until smooth. Don’t rush this step! A good mix here makes all the difference.
-
Add the Star Ingredient: Stir in the mango puree until you have a well-combined mixture. One thing I noticed is that if your mango is perfectly ripe, it adds a natural sweetness that can’t be beat.
-
Heat Things Up: Pour this mixture into a microwave-safe dish and cover it with plastic wrap. You don’t want the edges to dry out!
-
Microwave Magic: Microwave on high for 1 minute. After that, stir it, then microwave for another minute. Trust me, stirring helps everything become soft and uniform. For the final touch, give it a quick 30 seconds more until the mixture becomes sticky and translucent.
-
Dusting Setup: Dust a clean surface with potato starch. This helps prevent sticking, so don’t skip this step!
-
Cool Down: Transfer the mochi dough onto the surface and let it cool slightly. I usually let it cool for a couple of minutes but don’t let it sit too long or it might be too hard to shape.
-
Shape Your Mochi: Dust your hands with starch, then take small pieces of the dough. Flatten them, and if you’re using mango slices, place one inside before shaping it into balls or any shape you like.
-
Final Presentation: Serve your Homemade Mango Mochi fresh or pop it in the fridge for a delightful, cool snack.
Pro Tips for Best Results
- Be patient! If you try to rush the microwaving process, you might end up with mochi that’s not quite sticky enough.
- Don’t hesitate to tweak the sweetness by adjusting the sugar according to your taste.
- If you notice the dough is too sticky, just sprinkle a bit more starch as needed while shaping.
Variations & Customization Ideas
Who says mochi has to stick to just mango? Here are some fun ideas:
- Different Flavors: Try using different fruit purees like strawberry, blueberry, or even green tea for a delightful twist.
- Add Fillings: Experiment with other fillings like sweet red bean paste, chocolate, or even fresh fruits.
- Shaped Mochis: Make them into fun shapes—like hearts or stars—for parties. Kids will love it!
Common Mistakes to Avoid
- Skipping the Starch: Not dusting with potato starch can lead to sticky fingers and a messy kitchen. Trust me, it’s worth the preparation.
- Impatient Microwaving: If it’s not fully cooked, your mochi won’t have that chewy texture. You might need an extra minute depending on your microwave’s power!
What to Serve With Homemade Mango Mochi
Homemade Mango Mochi pairs beautifully with:
- Teas: Serve with a warm cup of green tea or a refreshing iced tea.
- Ice Cream: Vanilla or coconut ice cream complements the flavors nicely.
- Fresh Fruits: A fruit salad with more mangoes, strawberries, or any seasonal fruit works well.
Storage & Reheating Instructions
You can store your mochi in an airtight container in the fridge for 3-5 days—if they last that long! When you’re ready to eat, you don’t need to heat them up. Just enjoy them cold!
Estimated Nutrition Information
- Calories: Approximately 100 per piece
- Protein: 1g
- Carbs: 22g
- Fat: 0g
FAQs
-
Can you make mango mochi in advance?
Yes! Just keep it in an airtight container in the fridge for freshness. -
What if I don’t have sweet rice flour?
Regular rice flour won’t give the same chewy texture, but you can experiment if you’re in a pinch. -
How do I know when the mochi is done cooking?
It should be sticky and slightly translucent. If it’s still opaque, give it another 30 seconds. -
Can I freeze mango mochi?
Absolutely! Just separate them with parchment paper and store them in a freezer bag. -
Is there a vegan version?
Yes, this recipe is vegan-friendly! Just keep it as is.
Expert Tips for the Best Homemade Mango Mochi
- Always use ripe mango for the best flavor.
- Make it a family activity! It’s a perfect recipe to work on together.
- If you ever feel like making mochi on a rainy day, this is it.
To wrap it all up, making Homemade Mango Mochi is a delightful way to enjoy a flavor-packed treat that’s both easy and rewarding. You’ll find it a fun kitchen adventure—one that we can keep coming back to. I know I will! And remember, this Homemade Mango Mochi recipe is perfect for quick meals, easy snacks, or special occasions. Give it a try and see how it turns out in your kitchen!
Save this recipe for later, and happy cooking!
Print
Homemade Mango Mochi
- Total Time: 15 minutes
- Yield: 8 servings 1x
- Diet: Vegan
Description
A delightful treat that combines the chewy texture of mochi with the tropical sweetness of ripe mango.
Ingredients
- 1 cup sweet rice flour (mochi flour)
- 1 cup ripe mango puree
- 1/4 cup sugar
- 1/2 cup water
- Potato starch or cornstarch (for dusting)
- Mango slices (optional, for filling)
Instructions
- Mix the sweet rice flour, sugar, and water until smooth.
- Stir in the mango puree until combined.
- Pour the mixture into a microwave-safe dish and cover it with plastic wrap.
- Microwave on high for 1 minute, stir, then microwave for another minute. Add another quick 30 seconds.
- Dust a clean surface with potato starch.
- Transfer the mochi dough onto the surface and let it cool slightly.
- Dust your hands with starch, take small pieces of dough, flatten them, and add mango slices if using.
- Shape into balls or your favorite shapes.
- Serve fresh or refrigerate for a cool snack.
Notes
Mochi pairs well with green tea or vanilla ice cream. Store in the fridge for 3-5 days.
- Prep Time: 10 minutes
- Cook Time: 5 minutes
- Category: Dessert
- Method: Microwaving
- Cuisine: Japanese
Nutrition
- Serving Size: 1 serving
- Calories: 100
- Sugar: 5g
- Sodium: 5mg
- Fat: 0g
- Saturated Fat: 0g
- Unsaturated Fat: 0g
- Trans Fat: 0g
- Carbohydrates: 22g
- Fiber: 1g
- Protein: 1g
- Cholesterol: 0mg